Thursday, October 29, 2009

Thinking of You card - sketch challenge entry

I recently found out that an older friend is having some health problems and I want to send her a card to let her know I'm thinking of her daily. I knew the exact images I wanted to use, and remembered a great sketch I saw over at Rubber Stamp Chat for the monthly contest. This is what I came up with, and I thought it turned out beautifully.


Patterned papers are from the Basic Grey Lilykate collection. Glossy white CS is from Stampin' Up! Textured CS, Edge Anchor, dimensional adhesive, and all stamps are from Close To My Heart. Circle and scalloped circle were cut with the Cricut using the Plantin Schoolbook and Celebrations cartridges. I used the brayering technique on the glossy CS with a Kaleidacolor Baby Powder stamp pad, and embossed the butterflies with black embossing powder. I bent up the wings on both butterflies, and popped the right one up on dimensional adhesive.

Friday, October 23, 2009

October Christmas Card Challenge

I absolutely love the Christmas card challenges on the Christmas Cards All Year 'Round blog! This month's challenge is to use ribbon and pink papers, in honor of Breast Cancer Awareness Month. This was a true challenge for me, as I'm pretty sure I've NEVER made a pink Christmas card before! Here are my entries - individual cards w/ supplies used follow the main picture.

Please note: I have included links for my product sources where possible. I endorse and receive compensation for the Close To My Heart products. I do not endorse a particular website or receive compensation for any other products featured here.

My first card was made with my Cricut. In Design Studio, I used an image from Calligraphy Collection, rotated it, and stretched it until it looked more like a Christmas Tree. I cut the image from Sticky Pages and adhered it to my card. After peeling the top sheet off, I covered it with white microbeads. I used an adhesive rhinestone flower on top and circles for ornaments. I added my ribbon and a buckle along the bottom, accented with another rhinestone circle. Size is 5 x 6.5.

Sources: Provocraft - Calligraphy Collection cartridge; Stampin' Up! - Sticky Pages; K & Company - circle rhinestones; 7gypsies - ribbon buckle (I believe my color is Island);
Close To My Heart - Cardstock in Baby Pink and Bubblegum, Rhinestone Flower (no longer available); Other producuts: Organdy ribbon, white microbeads.
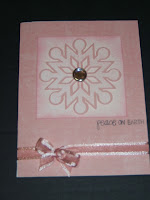
This standard size card was also made using my Cricut, and is a very simple design. My sentiment was stamped using the marker coloring technique to stamp a single phrase from a border stamp.

Sources: Provocraft - snowflake & shadow from Accent Essential cartridge; Recollections (by Michael's) - pink rhinestone brad; Close To My Heart - textured cardstock in Baby Pink from Spring Harmony and Blush from Winter Cozy, Exclusive Inks stamp pad in Blush and Grey Wool, black distressing tool, Jingle Borders stamp set; other - satin trimmed organdy ribbon.

The third card was so much fun to make! I stamped, colored & cut out my image on white CS and layered it on a second stamped image on my Baby Pink CS and added some fun Stickles for sparkle. Standard size card.

Sources: Ranger Ink - Icicle Stickles; Stampin' Up! - Watercolor Crayons in Bold Brights and Neutrals; Close To My Heart - Cardstock in Hollyhock & textured Baby Pink, B&T (pattern) paper from the Jingle paper pack (back side), Exclusive Inks stamp pad in Grey Wool and Hollyhock, Pretty Pins, and Designer Ribbon Rounds in Hollyhock.

For my fourth card, I really wanted to try the cute stamp of the month set for November (from CTMH). This one took a little longer to design as I wasn't sure ho to get the house and sentiment on the card together without covering anything up! I finally decided on a 6x6 card, with no matting of the image, and I think it turned out rather well. There are two features that are hard to see in the photo, but if you click on the photo you can see them better!

First, I colored in some of the white stripes using a ruler and my Ponderosa Pine marker. This helped the paper match the colors I wanted to use on the house better. Secondly, I used some loopy fibers (braided 3 strands together) to create a wreath for the door and added some red stickles to it.

Sources: Ranger Ink - Stickles in Frosted Lace and Christmas Red; Close To My Heart - Around the Block stamp set (NOVEMBER stamp of the month), Festive Thoughts stamp set (no longer available), Cardstock in Tulip and textured Baby Pink, Exclusive Inks stamp pads in Grey Wool, Tulip, and Ponderosa Pine, waterbrush, Designer Ribbon Round in Cranberry, and 3-D Foam Tape; other - pink velvet ricrac, loopy green fibers.

My final card is a 3x3 gift enclosure and is super simple to make. I used ribbon with a stitched center, so I could pull the stiches to scrunch the ribbon. Add a few buttons, a star brad, and a stamped sentiment and you're done!

Sources: Making Memories - star brad, Close To My Heart - Cardstock in Hollyhock and textured Baby Pink, Festive Thoughts stamp set (no longer available), Exclusive Inks stamp pad in Hollyhock; Other - off-white flat buttons, glue dots.

If you have any questions about how I did something, just leave a comment & I'll get back to you! I hope you enjoyed my cards, and that you go check out the fun CCAYR blog!

Thursday, October 8, 2009

A Friendly Reminder

Don't forget, today is the last day to enter the huge Scrap-box giveaway! See my original post here for the details.

Thursday, October 1, 2009

My First Blog Hop!

With the kids all in school, I finally have time to be able to commit to a regular blog hop! Since I love my Close To My Heart stamps, I've joined the CTMH Stamp of the Month blog hop. This month is a great Christmas set, with a really playful feel. It reminds me a little of Dr. Seuss, like the Who's tree in The Grinch Who Stole Christmas! So, without further ado, here's my entry into the world of blog hops:

Welcome to our Stamp of the Month Blog Hop! This is simple to do - just click on the link at the end of the post on each blog to move to the next one! Here we go!

I based my card on the Midpoint pattern in our new Wishes book. The only stamp set used is Holiday Warmth, the October Stamp of the Month. Other supplies used are as follows:
I popped my matted image up on 3-D foam tape for extra dimension, and I added Prisma Glitter with a glue pen for extra sparkle.
I repeated the sparkly glitter on the inside of the card. (A visual repeat of the sentiment!) Don't forget to "sign" your cards on the back! There's a great star stamp in this set that's a perfect place to scribble your initials.

Now "Hop" on over to Debra's Blog to see her work!

If you get lost on the hop or find links that aren't working, click {here} for a complete list of participating blogs. There are actually three groups for this month's hop, so if you want to see TONS of great ideas, go to the previous link to hop through all three groups!

Wednesday, September 30, 2009

ScrapBox - HUGE WorkBox Giveaway!

Are you dying for some organization in your life? Need to get your scrapping supplies off of the dining room table? If you're looking for some great Scrapbook storage, there's nothing sweeter than the Workbox from the Original ScrapBox!


How would you like to win this sweet setup? Take a visit over to the Midnight Madness blog, and get hooked up! Make sure you tell them I sent you.

Here are the other blogs where you can win:
Make It and Love It
Vanilla Joy
Auntie Thesis
The Mommy Files
My Organized Chaos
Life As Lou
Cricut Christmas
Capadia Designs
Rachelle’s Writing Spot

While you're waiting to find out if you're a winner, cruise on over to The Original ScrapBox and check out my favorite product, the super sweet MiniBox. There's room for this in any home, and they have enough colors/styles to choose from to match any decorating style! It only 37" wide, but stores a boat-load of crafting goodness - here's a photo:

And now, a great discount too! Enter this code when you place your order to get $100 off your shipping: 100Writes

Tuesday, September 29, 2009

Even More Disney with the Cricut

I'm pretty obsessed about completely scrapping this Disney trip before I get back to "normal" layouts. So, here's yet another series of shots from Epcot. My husband's favorite Disney movie is Aladdin, and he drives me crazy imitating the Genie a lot. So we HAD to find the Genie and get his picture and autograph. Here are the results:

Supplies used on this layout include the following:

Cricut - Dreams Come True cartridge, Opposites Attract cartridge
Close To My Heart - Stardust level 2 paper pack and MyStickease; Honey and Dutch Blue CS; Stardust Flexi Labels; White Daisy My Accents (discontinued); Fresh Shapes chipboard Dimensional Elements; Dimensional Foam Adhesive squares; Stamp Pads in Honey, Dutch Blue, and Moonstruck; layout page pattern from Jeanette Lynton

Stop by on October 1st for my first Blog Hop entry. Lots of stamping with a great Christmas set from CTMH. I'm sure there will be a TON of great ideas for Christmas cards!

Friday, September 25, 2009

Disney with the Cricut

I'm finally getting around to posting some more Disney layouts. I completed these a couple of weeks ago during a crop. This Snow White LO was based on a pattern from one of Jeanette Lynton's pattern books.


I cut the gorgeous title and the apples from the Happily Ever After Cricut cartridge. I just LOVED the font they used for "Snow White", but I had to make a few manual cuts to use it this way as it was part of a larger design.


Supplies used for this LO are as follows:

MME - all papers except white, flower die cuts
Creative Cafe - puffy felt flowers
Clear Scraps - clear flower shapes
American Crafts - pearl center brads
Close To My Heart - white flower rub-on used on clear flower shape, dimensional foam adhesive
Related Posts Plugin for WordPress, Blogger...