Showing posts with label Magic. Show all posts

Saturday, January 31, 2015

A Happy Hello - February Stamp of the Month Blog Hop

Hello and welcome to the Stamp of the Month Blog Hop! If you have arrived here from the fabulous Michelle Jones' blog, or if you are just starting out, you are in the right place! In case you get lost along the way, you can open this list of all of our particpants right here. This month, our stamp set is A Happy Hello, a set of 15 stamps sure to have you dreaming of Spring blossoms.

I decided to get another scrapbook layout under my belt for this year, and I love how it turned out!


I stuck with Smoothie, Crystal Blue, and Sweet Leaf as my color combo, adding White Daisy for my neutral.  I used Smoothie and Sweet Leaf patterns from the Paper Fundamentals Whimsy paper pack. (I used the tone-on-tone side of the Smoothie, so it may be a bit hard to see here.) I used a sketch pattern from the Magic how-to book to design my layout. I also used regular cardstock in Crystal Blue, Sweet Leaf, and White Daisy.  I stamped everything with stamp pads in Smoothie, Crystal Blue, and Sweet Leaf.


The photo mat called for in the sketch was 7x7, but I don't generally care for using odd photo sizes like 6x6. Instead I used the leftover area to create a little floral accent with several of the stamps in the set. I used 3-D Foam Tape to pop the flowers up off of the stems.


The flower designs were a perfect fit for the circle elements called for in the pattern.  I hand cut the Smoothie and Sweet Leaf flowers, and used a circle punch for the Crystal Blue ones. I used Flamingo Dots for the flower centers on the blue ones. (The middle shade is a close enough match to Smoothie for this use and adds a little punch of interest to the flowers.) I used more 3-D Foam Tape to pop up alternating flowers all the way around.  The Cricut title is cut at 7" using the Artbooking cartridge.

I'd love to hear what you think of my layout before you go! If you'd like to shop, all of the links above open in a new window so you can stay here to continue the hop. When you're ready, let's go visit the talented Lucy Kelleher and see what she has for us this time.

Tuesday, January 27, 2015

Always & Forever

I finally broke out my Year Noted kit this week - it's the National Papercrafting Month special from Close To My Heart - and I had a lot of fun for only $5! Rather than order the mini album, I chose to use my kit for traditional scrapbooking.

Portraits copyright Apartment C Photography, Springfield, IL - see end of post for details

I still have plenty of paper left for a second two-page layout, but I'm a bit under the weather so I haven't gotten to it yet.  For this layout I also used This Moment, the January Stamp of the Month, some scraps of White Daisy and Desert Sand cardstock, and some discontinued gold polka dot washi tape. I based the layout on a pattern from the Magic how-to book, changing things up a little bit.


For this large plaque, I cut this shape from the Art Phiolosophy Cricut cartridge at 4" and the title from Artbooking at 15". I stamped one of the little "gumdrop" banner shapes from the Year Noted stamp set at each end. I sponged the edges with Desert Sand ink.


Here's a closeup of one of my banner sections.  In the original pattern, they called for stacked rectangles here. I turned them into banners for a fun updated look, and popped up my washi tape-covered cardstock with some 3-D Foam Tape. I added a stamped banner using the This Moment stamp of the month set and Smoothie ink. I sponged the edges of the banners with coordinating inks.


These are all stamped using the This Moment set, and I added a gold foil heart from the Year Noted kit. I used stamp pads in Smoothie, Glacier, and Desert Sand.


For the journaling area, I used stamps from the Year Noted kit to add a bordered edge and date stamp. More ink sponged edges on all of my papers.


Finally, I added a string of gold foil hearts that were in the Year Noted kit. I could not be happier with how this layout turned out, and I'm really looking forward to making the second one!

There are only a few days left to get this kit, so if you haven't ordered yours yet (or if you need another one!), be sure to do it before the end of the month.  Here are all the details:

During the month of January, with a qualifying purchase of $50, you are eligible to purchase the exclusive Year >> Noted paper kit (which has a retail value of over $24 USD / $27 CAD) for only $5—that’s over 80% off retail! Or, for an additional $5, you can order the Year >> Noted paper kit with an accompanying My Creations™ kraft mini book. The paper kit for both options includes a C-size stamp set, stickers, cardstocks, and B&T Duos™ papers, all specially designed to coordinate with the My Creations™ kraft mini book so you can have a yearlong scrapbooking experience. This means you will receive over $34 USD / $37 CAD worth of product for only $10 if you purchase the kit with the accompanying mini book! But the fun doesn’t end there—included on the sticker sheet, you will find a large golden seal. Once the year is done and all the pages are filled, seal up your book and create a mini time capsule that you can open years from now. Remember, this deal is only available for January, so make sure to get your own Year >> Noted paper kit today for the perfect start to a crafty year!

Photography details: Portraits used my layout were taken by Apartment C Photography in Springfield, IL. You can find their website here, and their Facebook page here.

Monday, June 30, 2014

It's a Circus In Here! - July Stamp of the Month Blog Hop

Hello and welcome to the July stamp of the month blog hop! If you have arrived here from Sheila's blog, or if you are just starting out, you are in the right place. If you get lost anywhere along the way, I have a list of all the hoppers right here. (Click now and it will stay open in its own window while you hop.)

This month we're featuring Circus Alphabet - it's full of fun, doodle-style uppercase letters and a full set of coordinating lowercase letters and numbers. I can see lots of uses for this set, but for today I used it to title a layout about a school music program.


I used a sketch from the Magic how-to book, changing the one 8x6 picture on the left page to two 4x6 pictures.


I decided to split the title into pieces and used all uppercase letters for "music" and the lowercase on the other 2 sections.


To make the letters stand out more against the patterned background, I first stamped with
Lagoon pigment ink.  Once that was dry, I used a white gel pen to fill in the centers.  Because the "C" has doodles in the center, I stamped it again on top of the gel ink once it was dry.


I had several pictures, so I added some Flip-Flaps to get all of the photos included.  I will go back and add a strip of journaling to some pictures so I can list the names or make additional notes.

If you're ready to shop, I have a list below. All links will open in a new window, so you can easily continue our hop!  When you're ready to move along, head on over to Maria's Stamp Momma blog and check out what she made this month.

In addition to the items shown below, I used some leftover large adhesive sparkles from a wall decor kit and a White Signo Uniball gel pen. The green ribbon is from my stash.

Lollydoodle Paper Packet
Sorbet Cardstock

Adventure Pigment Ink Pads
Sorbet Stamp Pad
Pear Stamp Pad
Aqua Dots
Flamingo Dots
Bitty Sparkles
Sparkles Black & Grey Assortment

Circus Alphabet
4x6 FlipFlaps


Friday, September 16, 2011

Visit Illinois - the Prairie State: 50 States Blog Hop

Welcome to the 50 States Blog Hop! This hop was inspired by our host Shawnee's journey across the United States as she traveled with her family to their new home. The United States is truly beautiful with many wonderful places to visit and see.

If you've hopped along from Mississippi, then you are in the right place!! If you are just joining me from your dashboard or happened along from somewhere else, please be sure to CLICK HERE to start with the first state in the union, Delaware, because you won't want to miss out on any of the fun (or any of the blog candy!!)...

There is an AMAZING Grand Prize Package for one LUCKY hopper (winner chosen by Rafflecopter)!!  To be entered to win, please do the following:
So what's the Grand Prize???
Cricut Cartridge - Destinations, beautiful handmade flowers from Shannon at Creative Chaos Flowers, and a $20 Gift Certificate to Scraptastical Kreations.
Now on to my state and my project....

I live in Illinois, and although I live in the far reaches of "Chicago land" now, most of my favorite places are in other parts of the state.  One of my absolute faves for taking the kids is Starved Rock State Park in Utica, IL, and it just goes to show that the term "Prairie State" does not necessarily apply.  Here's a layout of one of our trips there:


I started my layout with a sketch pattern in the Magic book from Close To My Heart, adding a couple of the tricks in the book for getting additional pictures on your layouts.  Check it out:

Notice the tags attached to the outside of the left sheet protector and the Flip Flap mini protector open on the right sheet protector.
The pattern papers, stickers, and chipboard embellishments are all by Scrapbook Customs (which I purchased from Memories & Beyond in Downers Grove - and yes, they have all 50 states!).  In addition to the sketch book, all of my cardstock, brad, and the Flip Flap also came from Close To My Heart. My borders and large tags were all cut with the Cricut, using the Art Philosophy cartridge collection exclusive to Close To My Heart.  FYI: bonus until the end of September, make any CTMH purchase of at least $75 and get a FREE double size stamp set with your order.

I have some great BLOG CANDY for you myself!  I am giving away three great paper crafting publications - Paper Creations (Fall 2011), Scrapbooking & Beyond (Summer 2011), and Cricut Cards - an over $30 value.  It's simple to win, just be a follower (or email subscriber) and leave a comment.  (Not required, but I would love it if you go "like" my Facebook page as well - I have giveaways coming up over there as well!)  All comments entered before Midnight Central Time on Sunday night are eligible to win.  I will announce the winner Monday.  I will try to contact the winner as well if possible, so if your email is not on your Blogger profile be sure you leave it for me!

Now you can hop to the NEXT STATE IN THE UNION!!  Remember to leave a comment on each state to be eligible for the GRAND PRIZE!!


50 States Hop


.............


Thursday, September 8, 2011

Happy Days Layout with Echo Park Paper and Close To My Heart

It's Echo Park Paper month over at the Cutters Creek blog, and today I have a project up.  Since I added a few things using products from Close To My Heart, I thought I would post it here as well, with all of the extras.  You can read about the base layout over on the Cutters Creek Blog, including links to the Cutters Creek products I used in my layout.


I started with the "Ta-Da!" layout pattern from the Magic interactive scrapbook layouts book, changed up the right page a little, and added some interactive parts.  The shield shape for the title area is cut using the new Art Philosophy Cricut cartridge exclusive to CTMH.  Remember, be sure to head over to the Cutters Creek blog to see the base layout underneath here!  Look carefully, you may not be able to tell the difference right away...

  
This picture shows some added Flip-Flaps flipped open on the vertical pictures.  This is a REALLY easy way to add more pictures to a layout.


This final picture shows the Flip-Flaps for the horizontal pictures flipped open.  For this one, I have three Flip-Flaps stacked one on top of the other.  With their super adhesive flap, you can stick a stack right to the outside of your layout's sheet protector!

Close To My Heart products used:
 If you like this Echo Park Paper collection, be sure to head to Cutters Creek and see all of the 12x12 collections and 6x6 paper pads available from them.  Thanks for stopping by today!  Hope to see you again soon.

Saturday, July 30, 2011

Interactive Scrapbooking with CTMH, Echo Park, and Cricut

Hello!  And welcome to our "How Neat Is That?!" interactive item blog hop!  We're all sharing things that move in some way, and you should leave us with several ideas to make your projects interactive.  If you've arrived here from Dawns' blog, you're on the right track.  If you are starting here, you may want to head over to Scraps To Treasures and start at the "beginning".

For my project, I chose to create a layout with a "spinner thingy" - it's called a Revolving Door.  I used a pattern from the Magic book from Close To My Heart to design my layout, and followed the technique on the following pages to create my interactive door.  The book even comes with a DVD of PDF patterns so you can print and cut the pieces.  Or, as I did, import them into Make The Cut software to use with your digital cutter.*

Here's my entire layout:
Sorry for the poor lighting on this one; it was really hard to get that spinner lit properly!  The fabulous patterned papers and mini letter stickers are from a new line, The Apothecary Emporium from Echo Park Paper.  The coordinating cardstock is all from Close To My Heart, as are the stamps, and the Cricut cuts.

Here are a few important details for you:

This is the Revolving Door in it's original, upright position.  Note that the door spins on a large brad.  (I made this one using a sticker from the Echo Park Paper collection and a flat brad and epoxy sticker.)  It is also thick, made by sandwiching foam adhesive between two layers of cardstock.  This not only adds depth, but will allow the door to hold up better over time.  Also, FYI, the original pattern from the Magic book showed a flower shaped base here, but I didn't feel that went with the Halloween theme.  So, I found a neat looking doily shape on the new Art Philosophy Cricut cartridge (available August 1 exclusively from Close To My Heart), on page 31 to be exact.  I cut the top layer from a pattern and a solid layer from Sunset cardstock.

Here the door is turned one space.  Note that the journaling for each photo is in the space opposite it on the wheel.  I found that when cutting the photos it helped to cut my template from clear acetate that I edged with a Sharpie marker so I could see exactly what I would fit in my space before cutting the picture.

The broom and cat images are from Close To My Heart's stamp of the month set for August, and I added tiny little self-adhesive sparkles to the cat's eye's.

Here, the wheel is halfway between spaces.  You can see that the photos and journaling areas are each arcs that fit snugly together in a circle on top of a solid base.  I did choose to cut my journaling sections separately instead of in one large piece.  It made it easier to write the journaling on them before placing the Revolving Door on top.

One of my favorite touches on this layout, this image is also part of the August stamp of the month set from Close To My Heart.  She is stamped in archival black on white CS.  I colored her striped socks and the underside of her hat with a Sunset marker from CTMH, and I colored her skin with a Copic Marker.

Finally, the title was cut using the Font Layer function on the Art Philosophy Cricut cartridge.  I used the tiny cut holes in the letter design as a placement guide for adding some Smooch for bling.

Thanks for hopping by today!  I would love it if you would become a follower or subscriber, and come back another day to see what I am up to.  Don't forget, Scraps2treasure is having an overall grand prize and these are the simple rules: Become a follower, leave a comment at every stop and that's it.

Now, hop along to Jennifer's blog and check out her awesome project!

Thursday, February 24, 2011

We now resume our regularly scheduled programming...

Yes, I have been MIA for a while.  I really have no idea what's been going on around here, but I have gotten nothing done the last 2 weeks.  I blame it on illness (not me - the hubs & 2 of 3 kids) and school holidays.  And I think I MAY have had a milder form of the illness as I have been completely exhausted, but that could have been hormonal, lol.

Anyway, I finally managed to finish a layout I started a couple of days ago.  I love working with pictures of my kids when they were younger - these days they just drive me crazy with their clothes everywhere and food crumbs dropped wherever.  So I like to remember the "good old days", like these:


That title probably doesn't say what you think it does.  The hubs has told me many times that I sound like an English teacher, and I like a good play on words.  Therefor, "sibling revelry" instead of "sibling rivalry".  And yes, I AM a dork; I like it!

I actually have a few tips & techniques to go along with this layout today. First, the layout itself is from the Magic sketch pattern book.  This pattern contains directions for making a sliding photo, including how to cut the sheet protector.  I thought it was a fun little addition to my layout.  Now, for my paper I wanted to add a little bling, so I turned one of my patterns into glitter paper.  I started with papers from the Sweetheart paper pack, plus some Gypsy cardstock.  Using some Glitz glitter glue (similar to Stickles), I traced the lines on the paper.  I have to say, I got a little heavy handed this time; I was in a hurry to finish as school pick-up time was nearing so I went a little overboard.  Usually when I do this, it turns out looking as good or better than bought glitter paper.  At any rate, I still think it looks pretty good!

For my floral embellishments, I thought it would be neat if they matched the flowers in the paper with the heart shaped petals.  Of course, I don't have any that look like that, but I found some that I could alter a little to work.  I used the Just Blooms paper flowers, and cut between every other petal.  Then I rounded off those corners so they would look more like hearts, and I added some button centers.
My other embellishments include self-adhesive gems in pink, red, & purple, and the Sweetheart MyStickease.  My title was made using the Opposites Attract Cricut cartridge, welded on my Gypsy, and the Irresistibles Lots of Dots alphabet sponged with black ink.

That's it for today - hope I gave you a few helpful tips!

Saturday, January 8, 2011

Balloon Craze Layout With Make The Cut

UPDATE: the Balloon Craze SVGs are no longer free.  Select files are free for a limited time on Lettering Delights, so if you see something priced $0 make sure you "buy" it and download it ASAP!  Balloon Craze is now $5, which IMHO is still a good deal - there are 15 super cute images included in the set!
____________________________________________________________________________________

Well, THAT took longer than planned!  I was honestly hoping to have this layout done by Thursday but I had a small technical issue and an almost 6-year-old who refused to let me work for more than 10 minutes at a time.  Add in some errands that I will only do while he's in school, and my perfectionist nature, and this has dragged into a 4 day affair!  But oh was it worth the wait.  Here's the "outside" of the finished layout:
The entire layout was completed using the Splendor paper packet and additional cardstock from Close To My Heart, and uses the One-Way Mirror pattern from their Magic scrapbook sketch pattern book.  All of the designs were cut using the (currently free) Balloon Craze SVGs from Lettering Delights and Make The Cut software, and the title was cut using some True Type fonts and Make The Cut.  I also added some Glam Rocks using my I-rock tool from Imaginisce.

Here are some detail shots of my layout, followed by a little tutorial for cutting detailed images like this in smaller sizes.

This is the right page of my layout, opened up.  I had more pictures than would fit in a normal layout, so I made it interactive using CTMH's Flip Flaps 12" Assortment.  On the base layout, I cut my pictures 4" tall and created a 2x11 journaling area above them.  Then I cut a 6x12 piece of cardstock and duplicated the papers from the base layout on both sides.  I decided the position of my remaining photos and trimmed them to size.  The entire thing is then placed in a 6x12 Flip Flap, and the Flip Flap is then adhered in place on the outside of the Memory Protector holding the base layout.

You can really make your cuts "pop" with a couple of simple things.  After cutting your different colors, use coordinating ink and a sponge dauber to edge all of your pieces; this gives them a little extra dimension.  Add a little bling or shine to details, like my added Glam Rocks here, or some Stickles, rhinestones, etc.  Finally, pop up an entire assembled design like this balloon, or just a portion of a design.

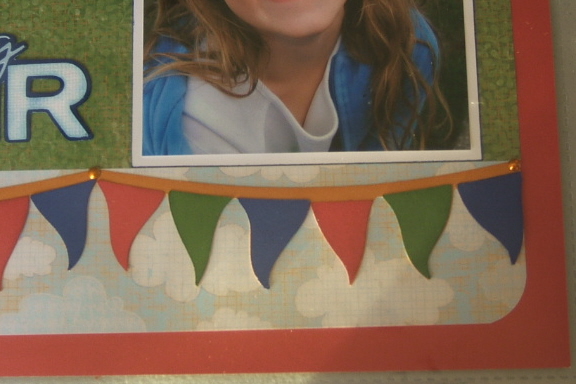
Don't limit yourself to the entire design in an SVG file.  I made this pennant border using a portion of one of the balloon files.  I deleted all the other pieces from my virtual mat in MTC, then using the remaining pieces I made copies, mirrored images, and welded the base pieces together to create the entire border.

Create a more lifelike scene using the appearance of perspective.  I repeated the balloon imagery on the right page in a smaller size to give these balloons the appearance of being farther away.  You can skip the details like inking edges on smaller images because you don't see those things when you're farther away.

Smaller images with details like this can be a challenge to assemble, but I have a method I use to speed things up a little and make it considerably easier to assemble.
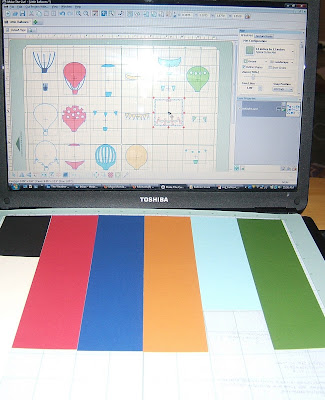
There is a great feature in MTC where you can change the color of the pieces you are going to cut.  Make sure you click the item, then right-click and choose Change Color/Texture > Select Color.  Then pick a color - I like to choose colors close to the actual paper colors I will be cutting.  Since I was cutting 3 images, I made three rows of pieces, keeping the pieces with the image they came from.  (Except the black & White, simply because I didn't have room to put the extra color on the same line, and those are easy pieces to tell which design they come from.)  Next I move the pieces around within the row, so that each color lines up in a single column.  (Note: I moved the light blue pieces up because I had a smaller scrap I needed to use.)  Finally, I got out my mat and put my paper on it following the colors on my virtual mat.

That means load the mat into the Expression once, and cut once.  WAY easy!
After cutting, I leave the pieces on the mat and just remove the "outside" cardstock scraps.  The pieces don't get lost because they're stuck on the mat.  I just peel them off one at a time to assemble the images.

I hope this helps you speed up your assembly of paper piecings!  Be sure to leave a comment and let me know what you think.
Related Posts Plugin for WordPress, Blogger...