UPDATE: the Balloon Craze SVGs are no longer free. Select files are free for a limited time on Lettering Delights, so if you see something priced $0 make sure you "buy" it and download it ASAP! Balloon Craze is now $5, which IMHO is still a good deal - there are 15 super cute images included in the set!
____________________________________________________________________________________
Well, THAT took longer than planned! I was honestly hoping to have this layout done by Thursday but I had a small technical issue and an almost 6-year-old who refused to let me work for more than 10 minutes at a time. Add in some errands that I will only do while he's in school, and my perfectionist nature, and this has dragged into a 4 day affair! But oh was it worth the wait. Here's the "outside" of the finished layout:
The entire layout was completed using the
Splendor paper packet and additional cardstock from Close To My Heart, and uses the One-Way Mirror pattern from their
Magic scrapbook sketch pattern book. All of the designs were cut using the (currently free) Balloon Craze SVGs from
Lettering Delights and
Make The Cut software, and the title was cut using some True Type fonts and Make The Cut. I also added some Glam Rocks using my I-rock tool from Imaginisce.
Here are some detail shots of my layout, followed by a little tutorial for cutting detailed images like this in smaller sizes.
This is the right page of my layout, opened up. I had more pictures than would fit in a normal layout, so I made it interactive using CTMH's
Flip Flaps 12" Assortment. On the base layout, I cut my pictures 4" tall and created a 2x11 journaling area above them. Then I cut a 6x12 piece of cardstock and duplicated the papers from the base layout on both sides. I decided the position of my remaining photos and trimmed them to size. The entire thing is then placed in a 6x12 Flip Flap, and the Flip Flap is then adhered in place on the outside of the Memory Protector holding the base layout.
You can really make your cuts "pop" with a couple of simple things. After cutting your different colors, use coordinating ink and a sponge dauber to edge all of your pieces; this gives them a little extra dimension. Add a little bling or shine to details, like my added Glam Rocks here, or some Stickles, rhinestones, etc. Finally, pop up an entire assembled design like this balloon, or just a portion of a design.
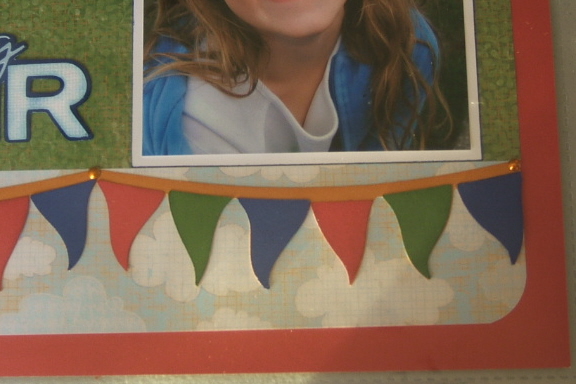
Don't limit yourself to the entire design in an SVG file. I made this pennant border using a portion of one of the balloon files. I deleted all the other pieces from my virtual mat in MTC, then using the remaining pieces I made copies, mirrored images, and welded the base pieces together to create the entire border.
Create a more lifelike scene using the appearance of perspective. I repeated the balloon imagery on the right page in a smaller size to give these balloons the appearance of being farther away. You can skip the details like inking edges on smaller images because you don't see those things when you're farther away.
Smaller images with details like this can be a challenge to assemble, but I have a method I use to speed things up a little and make it considerably easier to assemble.
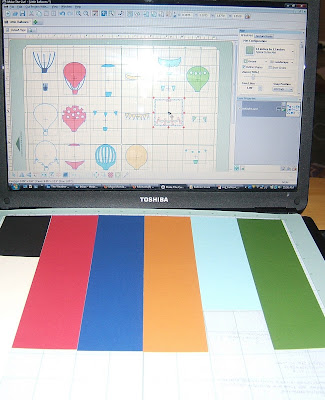
There is a great feature in MTC where you can change the color of the pieces you are going to cut. Make sure you click the item, then right-click and choose Change Color/Texture > Select Color. Then pick a color - I like to choose colors close to the actual paper colors I will be cutting. Since I was cutting 3 images, I made three rows of pieces, keeping the pieces with the image they came from. (Except the black & White, simply because I didn't have room to put the extra color on the same line, and those are easy pieces to tell which design they come from.) Next I move the pieces around within the row, so that each color lines up in a single column. (Note: I moved the light blue pieces up because I had a smaller scrap I needed to use.) Finally, I got out my mat and put my paper on it following the colors on my virtual mat.
That means load the mat into the Expression once, and cut once. WAY easy!
After cutting, I leave the pieces on the mat and just remove the "outside" cardstock scraps. The pieces don't get lost because they're stuck on the mat. I just peel them off one at a time to assemble the images.
I hope this helps you speed up your assembly of paper piecings! Be sure to leave a comment and let me know what you think.


Lori,
ReplyDeleteI love your layout of the balloons and the steps are easy to follow. Thanks for sharing.
Lori your layout is great. Love all the detail and information you provided about MTC.
ReplyDeleteWOW! This looks great!!! I seriously love this!
ReplyDeleteLori, this is great! :
ReplyDeleteI LOVE this layout! You did such a great job! I made a card using one of the balloons in this set, and I'd love it if you'd go check it out. :o)
ReplyDeleteLisa
prettypaperprettyribbons.blogspot.com
btw...I'm your newest follower! :o)
Outstanding! A great layout and an awesome tutorial on piecing smaller designs. Hugs, Fran
ReplyDelete