Showing posts with label challenge. Show all posts

Thursday, February 12, 2015

I Can't Use That For Boys! Can I?

One thing I hear frequently is how hard it is to find good products for "boy" scrapbook pages. Having a boy myself, I understand the difficulty, but I'm here to tell you that you can use all kinds of things that might seem "girly" on your boy pages.


Now I don't think this looks girly at all, but you might be surprised at the products I used to make it.

http://loribrown.ctmh.com/Retail/Products.aspx?CatalogID=104

This Hopscotch paper pack may seem a bit girly, with it's pastel colors, flowery looking circles, and even a sewing pattern design on one of the papers. To make things "worse", I added this stamp set:

http://loribrown.ctmh.com/Retail/Product.aspx?ItemID=8222&ci=1763

You might be saying, "Really? Flowers?! Can you get any more girly?" The answer, my friends, is to ignore the fact that this is a "flower" stamp set. A Happy Hello, the current stamp of the month, definitely has a flower vibe, but when you look at the pieces separately there are all kinds of possibilities. (Go take a look at your other "flower" stamps - you might find more!)

So, here's what I did:


First of all, I stuck to the paper patterns with a geometric look to them. Then I focused on the more boyish or neutral colors. Using the Ponderosa Pine cardstock for the page bases really grounds things, and the blue and orange are the main colors in my son's shirt here. I just laid my pictures on the different colors to decide which color would look best as the photo mats. I also think the orange really draws your eyes to the photos, which is just what we want!


For the stamps, I used the designs that were more geometric looking. I reinforced the look by using darker colors for the images that might be read as flowers. It also helped to only use half of the largest scalloped image so it seems even less like a flower.


Here, I used two of the stamps to create a "sun" to go with my title.  This also visually reinforces that these are not flowers. (The title is cut using the Artbooking Cricut cartridge.)


Here's a closeup of my not-flowers on the other page. Design placement is another key to making the eye see what you want. Notice that on both pages, I treated these as geometric designs and completely avoided any grouping that might make them feel like flowers. I also avoided using any additional embellishments.

Now, in case you think this layout design looks a little familiar, you're right! The newest challenge over at Heart 2 Heart Challenges is to use you favorite CTMH product. Mine is definitely our sketches in our How-To Programs, and this sketch from Make It From Your Heart volume 2 is my absolute favorite of them all! I have used this exact sketch at least 4 times, and it always looks different.

I hope today's tips were helpful to you! I'd love to know what you think, so be sure to leave me a little comment before you go.

Tuesday, March 25, 2014

A Country Card - and Some Challenges

After a yucky day of feeling sick yesterday, I really needed a crafty day today!  I thought I would stick to a smaller project, so I made a card for some of my favorite challenges.


I've had this sweet watering can stamp for a while and hadn't used it yet so I pulled it out, along with the coordinating die.  I thought it would work really well with these papers for the Country Flair challenge over at Heart 2 Heart Challenges this week. I always prefer working with a sketch, and definitely didn't want make my own today, so I went with my old standby of Mojo Monday. I wasn't sure at first how this week's sketch would work for this card, but can I just say that I LOVE it?! I'm also going to join in on the Anniversary Challenge at Our Daily Bread Designs; you just have to use ODBD stamps.


I used papers from the Jubilee paper pack from Close To My Heart, some woodgrain washi tape from CTMH, and a purple floral washi tape (that I think is from Love My Tapes).  I used a Spellbinders round die for my circle, sponging some Cashmere ink (CTMH) inside for added depth.


The Watering Can stamp and coordinating die are from Our Daily Bread Designs. The image is stamped in Memento Rich Cocoa ink, then die cut with the matching die. I colored the image using Copic markers. Here is a list of the colors I used:

  • E07, E08, E09 (can)
  • YG61, YG63, YG67
  • BV02, BV04, BV08
  • Y11, Y13, Y15
  • R22, R24, R27
  • YR04, YR07, YR27

Monday, April 2, 2012

Shape It Up! Challenge with Scrappy Frog

Sorry I'm late getting this up today, I've had a busy weekend! This month's challenge at Scrappy Frog's Challenge Blog is Shape It Up! (shaped cards).


I made two cards for this challenge, both using the Art Philosophy Cricut cartridge collection exclusive to Close To My Heart.  Did you know that this cartridge has 100 card cuts on it?  They make it super easy to make interesting cards.   The first card I made is the one on the right:


This card was made using cuts on page 24 of the Art Philosophy handbook and papers from the Florentine line.  I cut the base Card at 5.5" from the Garden Green CS, and the Decorative Layer at 5.5" from the light allover pattern.  I cut the Dragnfly at 4.25" from the medallion paper, and the Layer at 4.25" from the allover Twilight (blue) pattern.  I adhered only the body of the dragonfly to the Decorative Layer cut, and put 3-D foam tape under the wings.  I used Patina Stickles around the dragonfly and let it dry.  Nice & easy!


This card was made with cuts from page 32 of the Art Philosophy handbook, and papers from the Stella line.  I'm sorry I forgot to record the sizes I cut this at, but it's easy to figure out sizes using test cuts on some cheap or ugly paper, or by using you Gypsy or Cricut Craft Room to adjust the sizes of the layers.  I cut the card base from Sunset CS.  I cut the Oval2 from the red/orange pattern paper, and the Decorative Layer from Tulip CS, both at the same size, and adhered everything.  I cut the Layer from Sunset CS and adhered it using 3-d Foam Tape.  I added a few Opaques Pearls and that was it - a quick & elegant card.

If you want more information on what is included on the cartridge or in the entire collection, please let me know!  If you'd like to buy Art Philosophy, I'd LOVE to have you as my customer.  You can either shop online here, or email me to set up an online gathering where you can earn hostess rewards on any order of at least $150.

Thanks for stopping by today!  Hope to see you again soon.

Tuesday, March 20, 2012

I'm Certified! (and Probably Certifiable)

 Twelve days ago, I completed the first step of a journey I never knew I wanted to take: I have completed the Standard Copic Certification!  I bought my first markers about a 18 months ago, thinking I wouldn't use them much.  I've never really enjoyed coloring stamped images much, but I have become a convert!  I plan to take the Intermediate Certification  later this year, but I want to practice more with the Standard techniques first.

I've been a little short on mojo lately, but needed to make a card for my friend's mom, and was directed to the 7 Kids Challenge Blog by another friend, so I thought I might as well use some of my new coloring skills!
I have to say that this was probably not a wise image to start with!  It's full of tiny little areas that are hard to color, so of course now it's a challenge for me.  I think I did pretty well for this being the first time I've colored this image, and I am definitely looking forward to improving my coloring abilities so I can really do this pretty Sarah Kay stamp justice!

Supplies used for this card:
  • Stamp - Finn Whistling While He Works, Sarah Kay from Stampavie
  • Papers - from my stash (discontinued Close To My Heart)
  • Cricut cartridge - Elegant Edges (frame)
  • Border Punch - Effervescence border punch, Fiskars
  • Sentiment stamp - from my stash
  • tulle, ricrac, twine, button, crochet flower, and tag - from my stash
I'm entering this in the Anything Goes challenge at 7 Kids Challenge Blog.  If you'd like to enter too, you have until 3/26!

Monday, February 6, 2012

Die Cut Challenge

This month's challenge over at Scrappy Frog's is to use die cuts - how easy is that?!  Uou can make any project you want, so I chose to catch up on my scrapping a little and made a 2 page layout.


I used my Cricut Expression along with the Art Philosophy cartridge to create my cuts.  Using the Gypsy (or you could use CCR or Design Studio), I welded two borders to the right length, then I used the same border and welded two, top & bottom, to a rectangle to create my journaling box.

 The title is also cut from the same cartridge, but I hand cut the floral images.  They were stamped, cut out, and rolled, popped up, etc. for dimension.  (You can see how to make the rose in my previous post here.)  Then I added embellishments to the centers for more dimension & interest.


All of my supplies for this one are from Close To My Heart:
  • Pemberly Workshop on the Go (includes the embellishments)
  • Card Word Puzzle stamp set
  • Outdoor Denim stamp pad
  • Kraft cardstock
  • Pacifica cardstock
  • micro-tip scissors
  • 3-D Foam Adhesive Tape
Thanks for checking me out today! Be sure to stop over at Scrappy Frog's Challenge Blog and take a few minutes to join the challenge.

Pin It

Sunday, May 22, 2011

Birthday Challenge


Welcome to day #1 of Blog Candy Week here at Saving My...  Be sure to see the previous post for details and rules.  You could win big!

Today is the beginning of the Birthday challenge over at Scrappy Frog's Challenge Blog!  There is a new challenge every three weeks, and there are prizes.  Here is my DT entry for this theme:

I made this card for my mother's birthday a couple of weeks ago, and have been waiting to share it with you today for the challenge.  My card is based on a sketch from Sketch Support - I stuck pretty closely to the sketch for this one, only changing one paper to a ribbon.

The card base is from DCWV; the ribbon is from my stash; cardstock, ink, and stamps from Close To My Heart; and pattern papers and pins are from the Making Memories Chloe's Closet line.  I think the pins make great candle wicks/flames!  I simply pierced them through at the top of the candles, taped them down on the backside, then covered the entire inside top of the card with another piece of cardstock to hide all of the pin ends.

Now, be sure to head over to Scrappy Frog's and see what the other DT members have to inspire you!

Monday, May 2, 2011

New Design Team! And a Winner!

I'm happy to announce that I am a new DT member for the Scrappy Frog's Challenge Blog! This is a fun little challenge blog with prizes, so be sure to check it out and become a follower.  Most challenges are things you are probably going to do anyway, so it's a great opportunity to share your creations and maybe win a prize.

The challenge for May1 is Anything Goes (yay!) - the perfect challenge for me to jump in with.  I decided to share a layout I created recently using a sketch pattern.  As usual, my journaling is not in place yet, but it will go over the blue striped area on the far left.


I can't believe I made a layout with NO embellishments!  I only used paper.  I just didn't want to overwhelm the pictures and that cute paper, so I kept it simple.  The sketch design for this layout came from the Cherish book by Jeanette Lynton. The nice thing about this type of sketch is that she includes measurements if you want to follow along exactly, as I did here. OR, you can change things  up, like make the circles stars or hearts, change the sizes of things to fit your pictures, etc.  It just takes a little more work on your part!

My title and circles were all cut with the Cricut, except the animal circles.  I wanted to "fussy cut" them so I had an entire animal in each one, so I took the additional time and used a 2" circle punch.  My paper happens to be discontinued, but there are a lot of similar styles out there if you're looking for something like it.

I would like to point out that the baby in these pictures is now 6 years old.  Because I have SO many pictures to scrap, I live by my sketches!  They really speed things up considerably.  If you're looking for some awesome sketch books, my 2 favorite series are those from Jeanette Lynton (Close To My Heart) and the books from Scrapbook Generation (check out their books & free sketches at Sketch Support and let Allison know I sent you!).

Those of you looking for the blog candy winner from my Royal Wedding post are in luck!  I've had random.org choose a number, and the winner is Debican!  Debi, you have 48 hours to contact me, or I will have to pick an alternate winner - I'm off to try and contact you now.  Thanks for playing everyone!

Thursday, December 2, 2010

Cricut Circle Weekly Challenge #9 - Black Friday Challenge

For Black Friday, the Circle team has issued a special weekly challenge theme.  Here’s what we want you to do this week . . . Include the color black in your project AND recycle or repurpose something.
Project must be newly created for this challenge and must include atleast 2 different cuts from any Cricut cartridge to qualify. This challenge is open to Cricut Circle Members only.

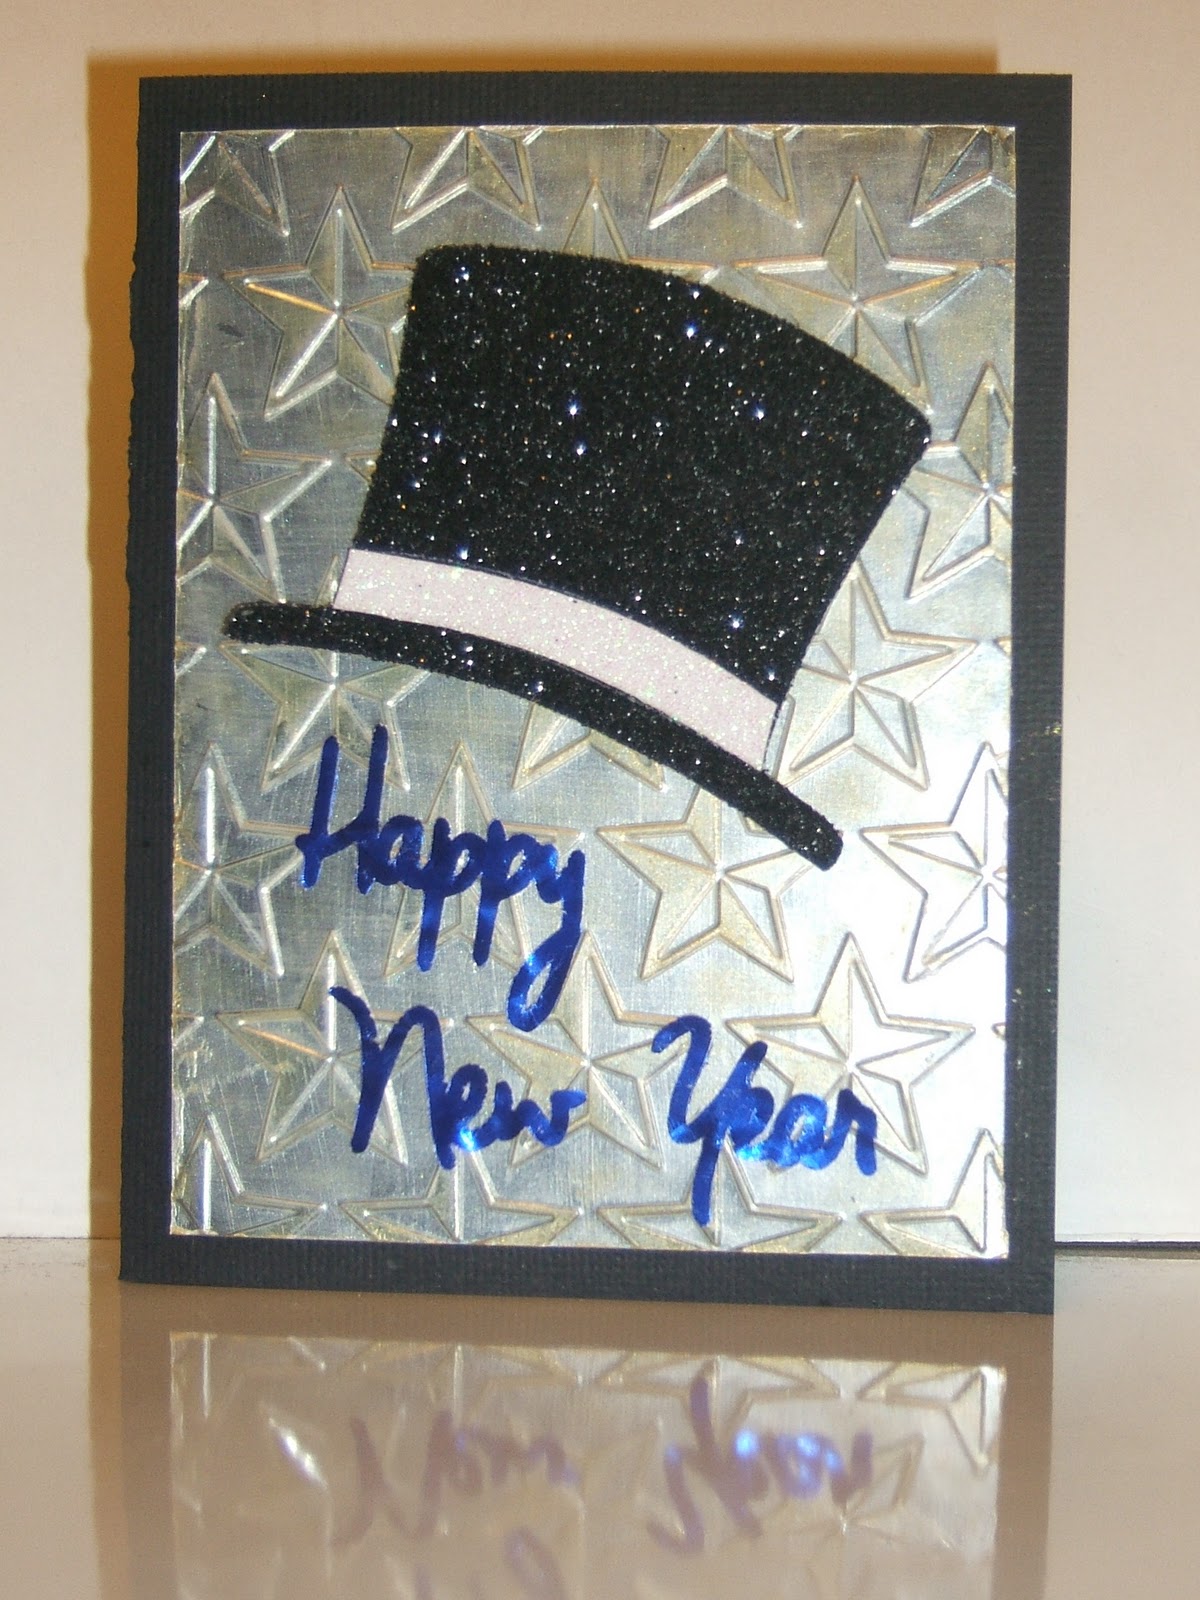
This one was pretty easy for me.  I love to use black in my projects, and I LOVE to recycle the plastic packaging from my Cricut carts & other items.  This week, I decided to make a New Year's themed card.  And I've decided I really need to buy another cartridge or two so I can have the exact elements I wanted to use for this card, but didn't have!


I created a 4.25" x 5.5" card, using textured black CS as my card base.  Next, I cut a 3.75" x 5" piece of plastic packaging, then embossed it using a Cuttlebug Stars embossing folder.  I painted the back side using some Create-A-Shade pearl paint from CTMH, and added metallic gold stamping ink to the front using a direct-to-paper technique.  Once dry, I adhered the panel to my card front.  The top hat is cut at 6" from American Crafts Glitter Cardstock, using the Paper Doll Dress Up cartridge.  I cut it once from black, then started cutting a second one from white.  I stopped it once it had made the hatband cuts and completed the cut by hand.  Happy New Year is cut from foil paper from my stash, using the Wild Card cartridge at about 1" real size.
Related Posts Plugin for WordPress, Blogger...