Tuesday, April 30, 2013

Album Title Page - Pinwheel Stamp of the Month Blog Hop

Hello and welcome to another Stamp of the Month blog hop! If you have arrived here from Lalia Harris' blog, or if you are just starting out, you are in the right place.  When we're done here, we'll hop along to Wendy Coffman's blog.  This month we are featuring Pinwheel, a set of 10 fun stamps perfect for any day! I am already envisioning birthday cards, as well as scrapbook layouts for Spring or Summer fun, the 4th of July, and more...  For today, I decided to create a title page for our 2012 scrapbook.


I rarely create single page layouts, but of course they are necessary for the first and last pages in an album! I find these pages perfect for random pictures and when I  have just a couple of pictures.  Because I so rarely scrap a single page, I used a layout sketch from Make It From Your Heart volume 1 to create my page. I rotated the sketch to work with my main photo and changed it up a little bit.  I didn't need journaling, so I placed my pinwheels in that area, and moved the title over to the right to  balance things out a bit.

My background paper is from Tommy and my photo mat is a pattern from Surf's Up matted on Cranberry cardstock.  The yellows are not identical, but they are close enough to work really well together. I substituted Washi Tape for the paper strip called for in the sketch. I like how the background pattern kind of shows through it a bit to make them work together better.


I stamped the pinwheel "sticks" in Slate to match the Washi Tape.  This stamp set does coordinate with the Artiste Cricut cartridge, but I chose to cut mine by hand since I was just doing a few.  After stamping and cutting, I curled all of ends around the "wrong" end of my quilling tool so they roll forward and look more realistic. I layered the pieces with 3-D Foam Tape in between the layers for more dimension.  I finished the pinwheels off by adding a dark blue Epoxy Bubble to the center of each one.


For the title, I cut numbers from both the Art Philosophy (0, 2) and Artiste (2, 1) cartridges from Outdoor Denim at 1 1/2". (Yes, they are cut at the same size, producing different size numbers.) I also cut a 1 1/2" circle to stamp the "Let's Celebrate" image in Honey.  I stamped it again in Cranberry and trimmed out the word "Celebrate" to layer on top of the circle using 3-D Foam Tape.

All supplies used are from Close To My Heart:
I hope you enjoyed my project today - I'd love if you take a minute to leave a comment.  Now let's hop over to Wendy Coffman's blog and see what fun project she has for us this month!

Thursday, April 25, 2013

Thinking Of You Card with Graphic 45 and Spellbinders

It's my turn again over at the Cutters Creek blog today! Here's my current project...

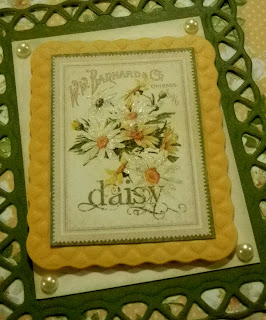
It seems that I am always needing some kind of a get well or thinking of you card.  (Maybe that's a sign of my increasing age, I don't know...) I like that kind of card to "feel" happy, and I decided some Secret Garden papers from Graphic 45 were in order.  Here's the most recent card I made:


I love the little cut-apart images G45 always seems to include in their paper pads, and these mini seed packet designs are just perfect and sunny looking. Layered on a couple of Spellbinders Nestabilities, this one was the perfect focal point for my 5x7 card.


I matted the focal image once, and popped that up with foam adhesive on a second matted blank.  I added Kaisercraft pearls to the four corners for a little something extra.

Lastly, I added some bling to my image using Copic Spicas in Orange, Lemon, Buttermilk, and Clear.  I hope you enjoyed my card today, and I hope my recipient has a sunny day after seeing it!

Items available at Cutters Creek:

Other Items Used:
  • cardstock
  • Spellbinders Lattice Rectangles
  • border punch
  • stamping ink & sentiment stamp

Tuesday, April 23, 2013

Something Old... Something New... with Creations by AR


Welcome to a fun post today! It's been crazy busy here lately, so it was fun to pull out an older design from Creations by AR and play.


This sweet Once Upon a Carriage file is also super fast to cut and assemble.  (And since the design is pretty simple, it's just as easy for the hand-cutters using the PDF file as it is for those of us using the SVG or DXF files.)  I fit all the pieces on one 12x12 mat, using a 6x12 piece of Cotton Candy cardstock and approximately 4x4 pieces of gold metallic cardstock and Chantilly patterned cardstock.


There are just a couple of simple folds for this design, and you end up with a sweet little party favor or a perfect mini gift bag for jewelry or a gift card.


I assemble the box and adhered the curtains inside the box using the 1/8" Scor Tape.  I added chipboard bows from the Chantilly Complements package, and different sizes of Pink Glitter Gems.


The Pink Glitter Gems also make great centers for the carriage wheels!  I hope you like my "new" take on this "old" friend - try one for yourself!

Thursday, April 18, 2013

Enchanted Lantern Gift Box

It's my turn to share again on the Cutters Creek blog, and I had a lot of fun making this project:

Today I have a different kind of gift box to share with you. The other day I used a new cut file for an Enchanted Lantern (see post below this one), and I decided I just HAD to make the open-window version, but with a twist. I basically closed up all of the windows and turned the "lantern" into a gift box.  With Mother's Day fast approaching, a small box like this is always handy for an elegant presentation of a gift card to a favorite store or lunch spot. At any rate, I was excited to measure the window openings and discover that the "trading card" images on my 8x8 Graphic 45 paper pad fit almost perfectly.  Here's what I did:


Even though the lantern itself is not an Asian style, I think it lends itself wonderfully to these papers. And would also look wonderful with many other G45 papers, due to its simple style. Since I was planning for Mother's Day, I chose 4 images and words I thought fit the theme well.  I used the Pagoda Cricut cartridge to cut the Kanji words to match each picture. The "photos" are all from the 8x8 paper pad, and the script paper forming the main box of the lantern is from the 12x12 pad.

"Mother"

"Wisdom"  
"Happiness"  
"Beauty"  
For some added dimension, the "photos" were adhered behind the windows with two layers of the ASI Kool Tak clear adhesive squares. I also added a frame around each opening with Distress Stickles in Fired Brick. I added additional Stickles dots along the base of the lantern on all sides.


As a helpful hint, since the Kanji characters are fairly intricate and I was cutting at only 1", I cut them from vinyl instead of paper.  It made them easier to cut and adhere to the shadow base. I then added more Stickles over them to tie in with the rest of the lantern.  The shadow is cut from metallic cardstock.  The American Crafts Specialty Cardstock - Foil is a great option for this.

Here are the Cutters Creek supplies I used for this project:

Other supplies:
  • black cardstock, suede texture
  • gold metallic cardstock
  • Pagoda cartridge for Cricut
  • Cricut indoor vinyl
  • Enchanted Lantern cutting file from Creations by AR

Tuesday, April 16, 2013

Enchanted Lantern - Creations by AR New Release Blog Hop


Hello and welcome to another New Release blog hop for Creations by AR!  This month's new release is the beautiful Enchanted Lantern, with 3 window options. All files are available in SVG and DXF format, as well as PDF for those of you cutting by hand! After seeing all of the beautiful things you can do with this file, I know you're going to want one of your own! And here's how you can WIN your very own:
• Leave comments on each blog
• AR FB: https://www.facebook.com/pages/Creations-by-AR/154314751303824
• AR PCP Group: http://www.papercraftplanet.com/group/creationsbyar

Comments accepted until Friday, April 19 (12:00 noon EST)
One random winner will be announced April 20:
AR FB: https://www.facebook.com/pages/Creations-by-AR/154314751303824
AR PCP Group: http://www.papercraftplanet.com/group/creationsbyar
AR Blog:  http://cbyar.blogspot.com

Now, who's ready to see some beautiful Enchanted Lanterns?! Here's my version:


I chose to make an elegant "garden party lantern" in soft colors. I even covered the inside of the windows with vellum (who remembers vellum?!) for a softer, romantic light.


I created my lantern using the Avonlea Paper Pack and Avonlea Canvas Shapes from Close To My Heart, and paper flowers and brads (for flower centers) from my stash. I assembled the lantern using Scor Tape and adhered the flowers using Liquid Glass.


 Here you can see my battery operated tealight. The lantern top conveniently sits on the lantern without adhesive, making it easy to remove and replace the tealight.


Here you can see what the lantern looks like "plain", on the back side. If I were making these for an actual Garden Party, however, I would definitely decorate at least two sides of the lantern. Wouldn't several of these look lovely as table centerpieces?

Now, I don't know about you, but I can't wait to see what the rest of the DT has created with this file! Before we go, be sure to leave a comment to be entered to win.  (And I would love if you come back here on Thursday when I plan to have another version of this made.)  Here's the list of DT members you should visit this month:
Adela - http://cbyar.blogspot.com/2013/04/creations-by-ar-april-blog-hop.html
Amy - http://tethered2home.com/?p=10167 
Jak - http://www.jakheath.com/2013/04/enchanted-lantern-blog-hop-creations-by.html 
Julia - http://createwithjulia.blogspot.com/2013/04/creations-by-ar-enchanted-lantern-april.html
Lisa - http://www.lisasomerville.com/2013/04/enchanted-lantern-creations-by-ar-april.html
Lori - <<<<<<<<< YOU ARE HERE >>>>>>>>>>
Lyn - http://www.lynspaperpetunia.com/2013/04/creations-by-ar-new-release-hop.html
Sue K - http://suesstampingstuff.blogspot.com/2013/04/creations-by-ar-new-release-lantern.html
Sue M - http://www.suessentiments.org/2013/04/creations-by-ar-april-16th-release-blog.html
 
Related Posts Plugin for WordPress, Blogger...