Tuesday, December 31, 2013

Cross-Stitch Wishes: January Stamp of the Month Blog Hop

Happy New Year and welcome to our first SOTM blog hop for 2014! If you've come here from the fabulous Mary Eisen, or if you are just starting out, you're in the right place. When we're done here, you'll hop along to the awesome Traci Godbee and see what she has to inspire us this month. In case you get lost along the way, you may want to open up this list of participating blogs (it opens in a new window so you can continue to hop here).

Stitching continues to be a hot trend in papercrafting, and Close To My Heart helps make it easy with this cute set of 13 stamps in Cross-Stitch Wishes. When you want it fast, use it alone for a great cross-stitched look. Want something a little more special? Use the stamps as a pattern to do actual stitching on your project!

I'm sticking with the fast and easy option for now, and I think it looks great. In fact, it was so fast and easy, I made two projects for today, a card and a home decor piece. I have a scrapbook layout in mind, but I need to find the pictures I wanted first! So, up first is my home decor piece:


I made this mason jar wrap to match my kitchen decor. I stamped the flowers on the Sweet Leaf CS with Topiary ink, then stamped them again on Honey, Cotton Candy, and Cranberry CS using coordinating inks. After cutting out the blooms, I sponged the edges of each one with coordinating ink and adhered them with 3-D Foam Tape.


It's more than a plain mason jar. I added a flower frog insert to the mason jar ring so I can use this as a vase. Mason jars are also enjoying a continued run as a hot item for all kinds of uses, so this is a great trendy use of both products.


I fashioned the band corset-style using some eyelets from my stash and some Baker's Twine. This makes it easy to remove if I need to wash the jar, or if for some reason I want to change it.

Now on to my AWESOME (if I do say so myself) card!


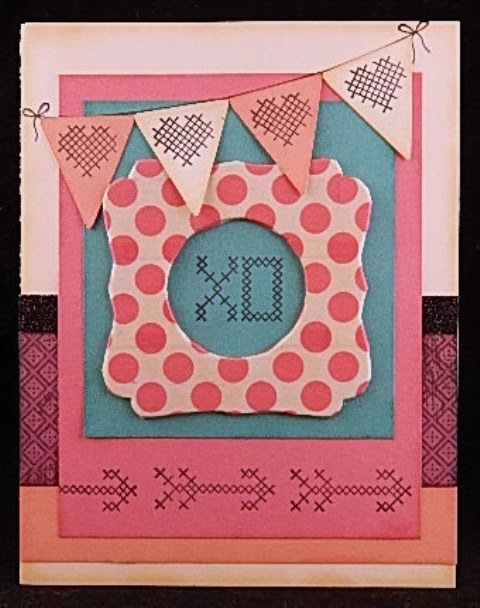
I started with a scrap of Laughing Lola pattern paper and a sketch from Make It From Your Heart Volume 2. I added shades of pink in Cotton Candy and Blush, Colonial White, and Lagoon for contrast. I stamped everything in Black to match the Laughing Lola, and sponged all the papers with coordinating ink (except the Colonial White - I used Champagne for that). I also added a strip of Black Shimmer Trim for bling. The pennants were cut with the Art Philosophy Cricut cartridge.


For this sweet frame, I wrapped a chipboard frame from  with washi tape. (This pattern is sold out, but there are other options - and more coming in February hint, hint) I just overlapped the strips to math the pattern, and trimmed and folded it to wrap the edges.  You can also just sand off the excess tape and ink the edges for a smoother finish, but I liked the wrapped pattern. I then sponged over the whole thing with Champagne ink to match the other pieces.

If you need to shop, any of the following links will take you to a new window. Or if you're ready to move on, I'd love to read your comments before you head over to Traci Godbee's blog.

Saturday, December 28, 2013

Design Team Day - 2 Parter

It's time for another Design Team Day! And, I just realized I forgot to post the last Design Team Day because I was out of town with slow internet and I completely forgot... So, let's check them both out today:

First, the post I forgot:

You can check out Amber's wintery card here. Remember, if Amber inspires you to shop with me, be sure to click the link that says "Amber from Sew-Ink sent me!"

Next, let's check out Lisa's project:

You can see the whole thing here. If Lisa's project inspires you to shop with me, be sure to click the link that says ""

Thanks for taking the time to stop by and check these projects out!

Sending You Sunshine

I got a little jump on Valentine's Day yesterday and made up this card:


Yes, I fussy cut a lot of images on this card. It's not something I would mass-produce for the kids' classrooms, but a nice card for one of my kiddos or even the hubby. Pretty much everything I used here is from the Holidays from the Heart mini book that expires December 31. (If you see something you like, buy it now because in a couple of days it will be gone.)

  • Sparkle & Shine paper pack (Juniper pattern paper)
  • Party Washi Tape 3-pack (pink polka dots)
  • Sparkle Chevron Shapes (around arrow head)
  • Charming Chevrons stamp set (red arrow head)
  • Lots of Love stamp set (all other images)
Other products include:
  • CS in Juniper, White Daisy, Ruby, and Cotton Candy
  • Stamp pads in Black and Ruby (stamping), and Juniper & Cotton Candy (sponged edges)
  • 3-D Foam Adhesive
  • Micro-tip Scissors
  • Dimensional Elements Mixed Shapes
  • Dimensional Elements Signage
  • White Cards & Envelopes Value Pack
 Now I plan to go back to scrapbooking some Christmas pictures to finish up that Sparkle & Shine kit! I have at least 4 more pages to go from 2010, and plenty of product left to finish them up, so I just need to sneak in some free time...

Friday, December 27, 2013

Delights of the Season

You probably noticed I didn't post much this month! Life has been exceptionally busy with holiday prep, school activities, and of course, work. (I didn't even share my Christmas cards with you I was so busy.) But I finally got some crafting time in, and I wanted to post a quick reminder that the Holidays from the Heart mini book ends December 31. In addition to Christmas, there are some great products for Valentine's Day, birthdays, and more.

Being in the Christmas spirit, I started with some pictures from Christmas a few years ago:


I used a simple sketch from Make It From Your Heart volume 2 along with the Sparkle & Shine Workshop on the Go - my title is a large stamp from the kit. The pictures don't do it justice - the "gray" in the houndstooth and ornament print is actually silver.


This was another stamp from the kit. I opted not to journal on this page since there are multiple layouts from the same day.


This layout was sent to me by my awesome upline Connie Hart; I just added pictures and a title. It used the perfect amount of photo mats for stocking gifts. She added some Silver Shimmer Trim & Small Sparkle Flourishes for bling.


I used a little Un-do to lift off this banner and added a title to it using my Silhouette Cameo and a silver Sketch pen. (If you have a Cricut, you can do a similar thing with their markers.)

I have some more photos from 2010 to scrapbook, but I am hoping to get a little jump on Valentine's Day later today first. See you again soon!

Friday, December 6, 2013

We Have a WINNER!!

Thank you to everyone who commented on yesterday's post! Here is your winner:

Wow, you've done a fabulous job on these. I love the color combo on the stacking boxes and the 'Santa' suit on the other box.

Rhonda, please email Adela and let her know which template you would like to receive. Please let her know you won Day 4 so she can find you in our list easily!

Thursday, December 5, 2013

Wrap Up the Holidays with Creations by AR!


Welcome to Day 4 of Wrap Up the Holidays! From December 2-9, the Creations by AR Design Team is sharing ideas for 4 new templates to help you wrap things up in style. Be sure to join us daily on the Creations by AR FaceBook Page, so that you don't miss any of the fabulous projects!  Continue reading below, to see how you can enter to win one of the Creations by AR Templates I'm sharing today!

I'm sharing two of the templates with you today, all decked out for Christmas, but I can't wait to use them for other holidays as well.  First up, the Gift Box Tower:


I turned my version into an elegant little piece of Winter Wonderland. I love the nice size of these boxes, and I know the kids will help me fill it with something nice for one of the grandmas!


I used Frosted papers from Close To My Heart for my boxes, along with Slate Satin Polka-Dot Ribbon, some Silver Glitter Tape, and a dark blue felt flower from the Frosted Assortment to finish it all off.


I  used 5 lengths of ribbon to create flower petals. Just sew basting stitches on 3 sides of the ribbon, smoothly rounding the corners. Then you pull the top thread so the stitches gather, pulling the gathered edge to the center of the petal. I adhered two lengths of glitter tape to the top of the crossed ribbons, then I used glue dots to adhered the individual petals on top, and adhered the felt flower to the center. I used Hook & Loop dots to adhere the ends of the ribbons under the bottom of the box, so it's easy to open and easy to reuse.

Next up, I created a fun & simple version of the Swirl Top box:


I used my Make The Cut software and enlarged all of the pieces as big as I could get them and still have one piece fit 12x12. I made a simple Santa theme for a fun way for a child to take a gift to their teacher. (I made mine large so it will hold a ruffle scarf I made.)


Santa's belt is just some Black Glitter Tape threaded through a ribbon slide from my stash (I think it is from 7gypsies). I cut the pieces for each side individually to keep it straight, since the box has angled edges.


I added a coordinating tag using some Cricut cuts and stamps. The baker's twine can either be tied to the gift itself, or taped to the inside of one of the flaps.

Either of these templates, plus the Triangle Compact, or Our House Gift Tag can be purchased separately, or you can purchase all 4 of them in a special December Bundle.

DAILY PRIZE GIVEAWAY:  To enter to win, simply leave a comment on this blog post, letting me know which of these new templates is your favorite. One random winner will receive one template of their choice, from the new templates shown here on my blog!  The winner will be announced tomorrow December 6th, here on my blog, so be sure to check back!  

Be sure to stop by Julia's Blog tomorrow for another chance to win one of these new templates and to see how she is wrapping up the holidays!  If you missed the projects created for Day 1-3, you can see what Patti created here for Day 1, what Jak created here for Day 2, and what Lisa created here for Day 3.

Saturday, November 30, 2013

Rescued Layout with Special Care - SOTM Blog Hop

Hello and welcome to another fabulous (I'm sure) stamp of the month blog hop! If you've arrived here from Sheila Bennett's blog, or if you are just starting out, you are in the right place. When you're done here, we'll head over to Wendy Coffman's Stamping Rules blog. And if you get lost anywhere along the way, just check this list for the next stop! Our stamp set this month is Special Care, a set of  6 large stamps with all sorts of applications - even one for mailing special packages, lol.

I have a bit of a sad story to go along with my post today.  At some point, one of my kids took a drink into the family room and set it on the sofa table. The same table where most of our scrapbooks live on the lower shelf.  I think we all know what happened next, but unfortunately, I did not know about it for quite some time.  By the time I discovered what had happened, I had about half a dozen layouts with mold growing on them. I know, big frowny face, right?  This is one of the examples right here:


This was a 2-page layout and the other page was not affected. But, since I no longer have anything remotely resembling the paper, stickers, etc., I recreated the whole thing.  Since the pictures were all fine, I just removed them from this layout to use them in the new one. The only thing I was really sad about was all the time it took me to create the background pattern on 2 pages - those "bubbles" are Mrs. Grossman's vellum stickers, you guys! (I know, I am totally dating myself...) BUT, enough crying over spilled whatever.

Here is the long-awaited NEW take on these pictures:

Just click to make it bigger!

Well, my style hasn't changed much has it? I totally "cheat" with sketches All. The. Time. now! This one is from Make It from Your Heart volume 2, and I just switched it up a bit for my pictures. There is no current paper line that matched all of the colors I wanted, so I really mixed things up.
  • The tone-on-tone background is from the former Dream Pop promotion (I do have a couple of these packs left if you're interested, or Lagoon CS would be close.)
  • The yellow pattern is from Babycakes
  • The pinkish-purple pattern is from Laughing Lola
  • And the darker blue is Pacifica CS
Now, some details for you:


 This grouping uses the stamp of the month, Small Sparkles Flourishes, the Babycakes Assortment, a Blue Epoxy Bubble, button from my stash, Baker's Twine Paradise Assortment, and Party Washi Tape. I cut out the stamped image and popped it up using foam tape.


This grouping uses all of the same items listed above, with a different image from the stamp of the month. (I can totally see stamping this on some of my mail!) This image, and 2 others, coordinate with the Art Philosophy Cricut cartridge for a little time savings.


More of the same embellishments for the title area.  I cut the title using a phrase from the Create A Critter Cricut cartridge.

So, that's all for today. I'd love for you to leave me a comment, then let's hop on over to Wendy's Stamping Rules blog and see what she created to inspire us this month!

Wednesday, November 27, 2013

Design Team Day with Amber

Yes, it's time for another Design Team Day! Today, Amber has two projects for us, both using Huntington papers along with some older stamps. Another great example of mixing new and old products together with beautiful results!


 (And have I mentioned how much I love the stitching that Amber always seems to incorporate in her projects?!) Let's head over to her Sew-Ink blog and see her projects in her entirety. Remember, if Amber inspires you to shop with me, be sure to click on the link that says "Amber from Sew-Ink sent me!"

Monday, November 25, 2013

Design Team Day with Lisa

Hello and welcome to another Design Team Day! Today Lisa has a beautiful looking project for us, using Huntington papers.


Let's head over to Lisa's My Creative Endeavors blog to see the whole thing! And remember, if Lisa inspires you to go shopping with me, be sure to click on the link that says "Lisa's My Creative Endeavors sent me!"

Thursday, November 21, 2013

Design Team Day with Mandie

Hello and welcome to another Design Team Day! Today Mandie from Mandie's Scrappin' is sharing a card using the Happy Autumn stamp set and a variety of papers.


Head on over to Mandie's Scrappin' to see the entire project! And remember, if Mandie inspires you to shop with me, be sure to click on the link that says "Mandie's Scrappin' invited me!"

Saturday, November 16, 2013

Design Team Day with Amber

Welcome to another Design Team Day! Today Amber has a layout for us using Laughing Lola. Here's a sneak peek:


Head on over to Amber's blog to see the entire project. And remember, if she inspires you to go shopping be sure to click the link telling me that "Amber fro Sew-Ink sent me!"

Tuesday, November 12, 2013

Creations by AR November Release Blog Hop

Hello and welcome to the blog hop for November's new releases from Creations by AR. This month we have two great new project files for you, and they both come with a free gift until November 30!

First up, a lovely Stuffed Stocking, and the bonus Holiday Wreath.


I used the bonus Holiday Wreath file to decorate the stocking, monogramming it with a stamp from CTMH and adding holly berries with Stickles. I conveniently used my initial, and informed my hubby that he could use this box for a little something for me!

Here's another view:

Since the main part of the box has square corners, it's super easy to put together! I used my trusty Liquid Glass to adhere all of the seams on this project, and I used a Quickie Glue Pen to adhere the wreath. It will look great in any of your favorite papers. I used Fa La La papers from Making Memories that I still had in my stash.


Look, here's a cute little "secret bonus section" - a second box in the toe of the stocking.

Next up, this awesome Pop Up Frosty card with wrap envelope and bonus Snowflake Set.

Isn't that cute?! Another project that's super easy to put together - just follow the directions in the included PDF file.

The file includes circle cuts for the eyes and buttons, but if you're a bit all-thumbs like me, some black brads are the perfect substitute! I used some silver glitter paper for the trim on his hat - I love how it sparkles!

Surprise! It has a built in slot to hold a gift card or a picture. Handy if you're like my family and we finally pass out school portraits at Christmas time!

I decorated the outside of the card to match the inside, using the same pattern paper and some silver glitter tape. I cut all of the snowflakes in the file at 3/4" from white adhesive vinyl.  I find that smaller sizes cut super cleanly and easily from the vinyl, and they are easier to adhere than cardstock.


I love this awesome wrap envelope! Frosty's chin tucks right in behind his scarf to close it. I made a green base to give it a more Christmas-y feel, but it would look awesome with a blue base as well. I used black brads again to make his eyes.

So, how much do you want these project files?! You might even be lucky enough to get one of them (plus its bonus file) for free!  This month we will have two winners: the first for the Stuffed Stocking and Holiday Wreath files, and the second for the Pop Up Frosty and Snowflake Set files. And how do you enter to win? Just like this:
• Leave comments on each blog
• AR FB: https://www.facebook.com/pages/Creations-by-AR/154314751303824
• AR PCP Group: http://www.papercraftplanet.com/group/creationsbyar

Comments accepted until Nov 17 (12:00 noon EST)
Two random winners will be announced Nov 18 on the AR Blog:  http://cbyar.blogspot.com

Make sure you stop by ALL of the clogs in this hop. Here's the list:
Thanks for stopping by today! I hope you enjoyed my take on these great projects.

Tuesday, November 5, 2013

Sharpen Your Skills With Challenges

I love to work with challenges! They always give me new ideas, and many times get me using things together that I would not have thought of.  Combining 2-3 challenges helps me stretch my skills even further and gets me thinking outside the box. This morning, I finished just such a project and I am so pleased with the results!


I really loved this week's Mojo Monday sketch, and I am hoping to find time to use it multiple times this week for some different types of cards. Then I saw the current Color Dare challenge to use black & white with green and I knew my first project would be a birthday card for my green loving hubby. His birthday is next month & now I am all done ahead of time - yay me!  Here's the example sketch from Mojo Monday:


The black & white of the challenge made me instantly think of the For Always paper pack. The pattern is more subtle than the picture shows; I had to sharpen it up a it to get the green to look better.


Of course a party needs glitter, and these sparkly balloons from the Artiste Cricut cartridge were just what I wanted.  I used the Green Glitter Paper from CTMH, and the black is Glitter Cardstock from American Crafts. Cutting both materials really made me appreciate the CTMH product even more, and I will be ordering the Black & Gray pack the next time I place an order! It cut so smoothly, in a single pass, where I had to use multi-cut with the chipboard then ink the sides to cover the gray chipboard. And better than the Pow! option from AC, the colors of the green glitter papers are nice and bright. Since this is a heavier material, I adhered the balloons with my trusty Liquid Glass so they will stay put.


I stamped on the tag with a Hostess Exclusive* stamp set, The Party Is On, in Black and Topiary ink. I used Black Distress Ink on the edges of the tag (and on the sides of the black balloon, and the edges of the background paper), and finished it off with a Baker's Twine bow.

The wide green ribbon on my card is from my stash - it was part of packaging on something we bought. Keep your eyes open when you are buying things like blankets, pajamas, and more, especially at Christmas time!

*Hostess Exclusive stamp sets are sets that can be bought at a reduced price using Hostess Rewards. You don't have to host an actual gathering at your home to get Hostess Rewards; you can use the EZinvite system like an online "book party", or contact me to place an individual qualifying order that earns Rewards. You can see all of the Hostess Exclusive stamp sets in the online catalog located here.

Thursday, October 31, 2013

Sparkle & Shine - November Stamp of the Month Blog Hop

Hello and welcome to another Stamp of the Month blog hop! This month we have over 50 hoppers sharing ideas for Illuminate, a set of 15 stamps sure to light up your life.  If you've arrived here from Judy's Making Time for Memories blog, or if you're just starting out, you're in the right place.  When you're done here, we'll head over to Haley's Inky Scrapper blog and see what she has to inspire us this month. If you get lost along the way, you can find the full list of hoppers here.

I had a great idea for a scrapbook layout this month, but not enough time to find the pictures and pull it all together. So I wound up deciding to make a Christmas card, and I love the way it turned out!


I used a sketch from this week's Paper Players sketch challenge. I'm also playing along with the Layers challenge at Heart 2 Heart.  Here are some details on my design:


The papers and rosette are from the Sparkle & Shine Workshop on the Go. I used washi tape for both the blue houndstooth border and the three banners. I stamped the lantern and sentiment in black pigment ink and embossed it with black embossing powder.  I added a candle stamped in Ruby, and candlelight stamped in Honey pigment ink and embossed with clear detail embossing powder.


I'm afraid I'm a little out of practice making snow and I did this a little too quickly. To make it look nicer, you want to use Liquid Applique to draw on your snow design, sprinkle on some prisma glitter, and let it dry a few hours. (The dry time is what I forgot about!) Then heat emboss it and it will puff up and look like sparkly snow.  I added a sprig of holly with Glitz glitter gel.


The circles behind the rosette are from the Sparkle & Shine chipboard elements with bitty sparkles added. I also sponged the edges of all the papers with coordinating ink. And I thought the sentiment was perfect for Christmastime. I'll add another sentiment to the inside of the card.

I hope you enjoyed my idea for you today.  Be sure to let me know what you think, then head on over to Haley's blog to see her project.
Related Posts Plugin for WordPress, Blogger...