Sunday, June 30, 2013

What a Sweet Life! - July Stamp of the Month Blog Hop

Hello and welcome to our last stamp of the month blog hop for the Spring/Summer 2013 catalog cycle!  If you have arrived here from Jen Rubio's blog, or if you are just starting out, you are in the right place! When we're done here, we'll hop over to Wanda Riley's blog and see what she has to share with us. This month's stamp set, Sweet Life, is easily one of my favorites, and I will definitely be using it a lot.  Here are the first two projects I made with this set.  I started with a card:


I based this card on this week's Mojo Monday sketch, using the Buzz and Bumble Workshop on the Go.  I added a sheet of Olive cardstock as well. I colored my Color Ready Seam Binding ribbon with an Olive marker, and colored in my stamped image using Olive and Sunset markers.  I distressed the edges of all of my papers using sponge daubers and coordinating inks. All of the embellishments I used are included in the WOTG kit, along with another awesome stamp set.


I really like the sketchy look of the images in this stamp set. And I think they look great with the Buzz and Bumble colors and patterns.

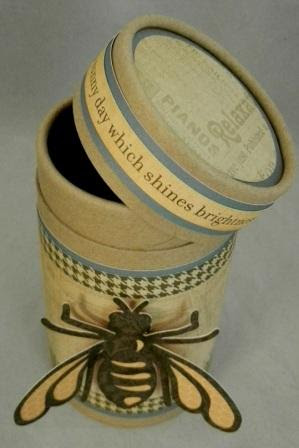
I like my second project even better! I made this little home decor piece on our 6x6 canvas.


I placed an acrylic stamping block behind the canvas to have a flat surface on which to stamp.  Then I just stamped the designs and sentiments with Exclusive Inks stamp pads.  I pleated paper and ran it through my sewing machine for that cute skirted border along the bottom. I distressed the folds with Cocoa ink and attached it to the canvas with Liquid Glass. (This really is my favorite adhesive!) The last thing I added was a little bee from the WOTG kit embellishments.


I colored in the images with our alcohol markers (except the brown, which is a Copic).  The canvas is the perfect material for this because it gives the markers more of a sketchy look to go with the stamped images.  Just be sure to use a light touch with the markers so they don't bleed outside of the lines.

I hope you enjoyed my projects today! I'd love if you let me know what you think before we head over to Wanda Riley's blog.

Of Husbands, Hockey, and Home Decor

There are very few things that my husband truly enjoys; watching hockey is one of them.  In particular, Chicago Blackhawks hockey.  We had the unbelievable opportunity to take in Game 5 of the Stanley Cup Finals at the United Center, so I had to commemorate it with something more permanent and awesome than a t-shirt:


I took the main photo just as the Hawks won the game, and the players were all leaving the bench for the ice.  It was a great memory to capture, along with the smaller pic of hubby basking in their win from our penthouse view.  I thought the Workshops on the Go Canvas Art Kit was the perfect way to display these pictures; they'll look great right along with our "traditional" home decor pieces.


This neat little chipboard frame I stamped is super cute, and I love the fun & trendy arrow chipboard embellishments.


More of the chipboard shapes, both stamped and as-is, make a great accent for the main photo.


This is the sample artwork from corporate, and the version shown in the instructions that come with the kit.  I'm definitely planning to get another one to document my upcoming class reunion next weekend. My school colors were blue & white with red accent, plus it's the weekend of the 4th, so these colors will be great for that version! It comes with two sheets of chipboard shapes in two different color combinations, but they're really easy to mix & match as you wish.  You'll notice that I stuck pretty close to the original layout,but you can change that around however you like too.

My favorite part about this whole thing? Of course it looks awesome, and it was totally quick and easy to put together, but what's really great is that the kits are on sale for just $19.95 July 1 through July 31! You can see the whole kit, with everything that comes in it, right here on my website. Be sure to grab a bottle of Liquid Glass and 3-D Foam Tape if you don't have any. They make attaching everything to the canvas super easy!

While you're there, make sure you check out the "Let's Get Patriotic" promotion. Celebrate military service and promote patriotism with our new patriotic stamp sets—available only until July 31, 2013. Three dollars from each B-size My Acrylix® Courage stamp set and $5 from each D-size My Acrylix® Home of the Brave stamp set will be donated to the USO, the leading, most recognized military-support and services organization in the country. Show your support with your own patriotic stamp set!

Thanks for checking out my project; I'd love to hear what you think! And don't forget to come back later for our monthly Stamp of the Month blog hop.  I really LOVE July's stamp set, and I'm sure I'll be using it a lot!

Saturday, June 29, 2013

Later, Sk8r!

Who else has trouble finding good papers for boys? Baby and toddler stuff is easy, and even masculine papers are getting easier, but I'm talking BOYS - like the 6-16 range.  So I was ECSTATIC when Close To My Heart came out with these cool Later Sk8r papers.


Just the right amount of masculine mixed with some fun!  I added in cuts from the Artiste Cricut cartridge and some In Gear stamps to scrap these little gearheads at their pinewood derby race.


A closeup of some gears from Artiste - I did not stamp on any of these, they are just the paper designs. The title is also cut from the Cricut. "Future" is from Opposites Attract and "gearheads" is from Art Philosophy.


My journaling card was also cut with the Cricut. It comes from page 45 on the Art Philosophy cartridge.  The banners were all cut by hand. I added some Durables Artisan Studs here and there for more "manly" accents.

The paper pack alone is sold out, but the Workshop on the Go is still available (in limited quantities), and comes with an awesome exclusive stamp set, epoxy bubbles, an accent assortment, and an instructional guide, all for a reduced price.

I'm also linking this post up the Heart2Heart color challenge this month to use your favorite colors.  I LOVE blue, and tend to use it in most of my projects.  And I really like the additions of the green, gray, and white.

Thanks for stopping by today! I'd love to hear what you think of today's project.

Thursday, June 27, 2013

More Decor with Buzz and Bumble

You may remember the cute little wall decor piece I made way back in January using the February stamp of the month and the Buzz and Bumble papers... well, I finally got around to making a couple of coordinating decor piece so that I can hang a series of three in my hopefully-soon-to-be-remodeled laundry room!

Here are the new additions:


And here are all three together:


I will likely hang them like this, with the center one placed higher. They were super easy to make, with only one stamp for each, and the extra coloring is totally optional! The ribbon is attached to the back using Liquid Glass.

While I was creating, I also decided to decorate one of our Kraft Containers to match. It will be a great place to drop any "treasures" I happen to find while doing laundry instead of just laying them on top of the dryer (where they tend to vibrate right on to the floor).


I added a sheet of Twilight cardstock to my arsenal for this, in order to add some contrast between all of the neutrals.  The bee was cut with my Cricut using the Home Decor cartridge, but there are some stylish looking bees on other cartridges too!

If you're looking to reproduce these, here's what you'll want to have:
Other products:
  • 4" burlap canvas - the ones I have are no longer made; if you can't find any, our 6" canvas is a great alternative!
  • Cricut Home Decor cartridge (or other cartridge with a bee of your choice)
  • Sewing machine with brown upholstery thread (or fake it with a pen or stamp)
Just a warning: the Buzz and Bumble is in VERY short supply, so if you want one, NOW is the time to order!

 Thanks for stopping by! I hope you enjoyed today's project ideas; I'd love to hear what you think.

Tuesday, June 25, 2013

Design Team Call!

As you can probably tell by my low number of posts this month, life is crazy busy at the moment!  In order to help my work/life balance, I am recruiting my first ever Design Team!! If you would like to receive free Close To My Heart products, as well as have the chance to earn even more, this is the Design Team for you.

If you are interested in applying, here are the details you need to know:
  • Design Team commitment is for 6 months, August 2013 - January 2014.
  • You must have your own blog, and know how to use the features of your blog platform, including (but not limited to) scheduling posts, inserting links, and adding linked images to your sidebar.
  • You must be willing to promote my CTMH shopping website exclusively (you may not be or post for another CTMH consultant, or for another direct sales company's consultant), as well as this blog and my facebook page.
  • You must be willing to belong to a Design Team group on Facebook and set it to receive notifications of all posts.
  • You must be willing to post one project of your choice per month, on your assigned day, to your own blog (we will work the schedule out among the team in order to work around any other DT commitments you may have), plus one blog hop during the 6 month period.
  • You must be willing to provide me with a photo of your project at least 2 days in advance of your post so that I can use it to direct my readers to your blog on the day of your post.
In exchange for your efforts, you will receive free products.  You will get a Workshop On The Go kit (one of your top 2 choices) and a 6x6 sampler ring to begin with.  Full details will be given when DT position is offered.

In order to apply:
Simply email me using subject line DT APPLICATION 2013 with the location of your blog and any other social media or groups (like Splitcoast Stampers) that you wish me to see.  No need to attach any projects, as I am looking for overall style and types of projects you create.  If you have a specific project you want to draw my attention to, it's fine to attach it or provide me a link. Also, please provide me with your (real) name and city, state.

This DT is open to US residents only, as I am not allowed to sell in other countries.

DEADLINE TO APPLY: July 3, 2013 - I will start to make offers as early as July 8, in order to get new product in your hands ASAP!

Wednesday, June 5, 2013

Pretty & Practical Laundry Room Solutions

As you may know, I'm on a mission to "clean" our house - basically remodeling and reorganizing things to make them easier to use and easier to keep clean. I have grand plans for our pantry/mudroom/laundry, but 3 rooms in one requires a bit of money so I'm doing things in fits and starts. At any rate, I found myself requiring a laundry-type project when all of the outgrown shoes were brought to me at the end of the school year.  Even after a good laundering, a certain child's sneakers were still rather, shall we say, odious...

I had recently read an article about using coffee grounds to deodorize shoes, and I thought it was a great idea! No one in our house drinks coffee, and I had some for visitors in my pantry which had expired so this was a perfect use for part of it. (I hate to throw away anything usable!) Of course I couldn't just toss the grounds in the shoes, so in looking around for something to put them in, I remembered I had two of a 3-pack of muslin drawstring bags left in my craft room. (Hooray!)


Since they'll be hanging around when they're not stuck in some shoes, I wanted to make them pretty and match the future colors of the pantry/mudroom/laundry.  Since I may feel the need to wash them at some point, I made sure to use products that won't wash out: Staz-on ink for stamping and alcohol markers for the coloring.


I used Timber Brown Staz-on to stamp my images. I colored the bumblebee with a set of Honey alcohol markers.


And I used a set of Indian Corn Blue alcohol markers to color the dragonfly.  As you can probably see, alcohol inks flow further and more quickly than usual on fabric.  I worked as quickly and lightly as possible, so any halos around my images would be as light as possible.


After making my bags pretty, I just filled them with coffee grounds.  You could also use baking soda, but I thought the strong smell of the coffee would help compete with the sneaker stink!


Here they are all filled, tied up, and ready to do their job!


And here they are in action! I am happy to report that this expensive pair of shoes (that the child helped pay for by the way - I'm not crazy) are now de-stinkified and ready for some other lucky kid to wear!

These bags would also make beautiful sachets filled with your choice of herbs and/or essential oils. (What a cute addition to a bridal or baby shower gift!) If you'd like to reproduce them, here's a list of the supplies I used to make them:

Saturday, June 1, 2013

A Masculine Card with Mojo!

Hi there! Today was my turn to share a manly card on the Cutters Creek blog and I thought you'd like to see it here as well. I based my card on this week's Mojo Monday sketch 295. It's a round or square sketch this week, and I chose square. If you want to see all of the details on the card, you can visit the CC blog!


That's it for today. Thanks for stopping by!
Related Posts Plugin for WordPress, Blogger...