Showing posts with label Laughing Lola. Show all posts

Monday, March 31, 2014

Girls Night Invite - Made Simple With Perfect Layers Mini

Hello there, and welcome to the Perfect Paper Crafting Brand Ambassadors blog hop! For today's hop, Brand Ambassadors like me will be sharing projects made with the awesome new Perfect Layers Mini tool set.  This is a perfect product for people like me who are a little anal retentive exacting, and need things to be just perfect.

Along the way, you can also play for one of two awesome prizes! You have the chance to win either a $50 gift certificate to the Perfect Paper Crafting online store, or a $25 gift certificate to Sugar Pea Designs online stamp store. To be eligible, just be sure to leave a comment on all of the participating blogs. You have until Midnight PST this Friday (April 4) to leave your comments, and winners will be announced on Sunday April 6.

Now, on to my project:


Now, who couldn't use a girls night out? And this classy little invite couldn't be easier to make, thanks to the Perfect Layers Mini set! I used some inchies stamps that I've had for some time, and stamped them in black pigment ink on white cardstock.  After drying, I trimmed them out and adhered them to some Lagoon cardstock (CTMH). Using the Perfect Layers Mini set and my X-acto knife, I trimmed them with a 1/16" border.  I then adhered them to Black cardstock (CTMH) and added an additional 3/16" border.


Next, to put both pieces on a single mat, I adhered them to a piece of Gypsy cardstock (CTMH) using the grid on the Perfect Cutting Mat to eyeball a 1/4" distance between them. I then used the Perfect Layers Mini to trim a 1/4" border all around.

I cut a 3" x 5 1/2" center panel (Laughing Lola from CTMH) and mounted it on a Lagoon cardstock scrap 5 1/2" wide. I used the Perfect Layers Mini to add 1/2" borders on each side, and adhered the whole thing to a 4 1/4" x 5 1/2" card base.


I added some Black Shimmer Trim and resin flower (both CTMH) for a little interest. Now, to make some clones of it, and I'm all ready to start planning my next girls night out! Don't forget, if you decide to go shopping be sure to use the code LoriB5% at checkout to save 5% on your purchase.

Thanks so much for joining our blog hop today! Don't forget to leave a comment before you go for your chance to win one of those great prizes.  Here's a list of all our participating blogs:

Perfect Paper Crafting & Laura Lynn http://blog.perfectpapercrafting.com
Wendy Ramlakhan http://sugarpeadesigns.com/blog/

Susie Moore www.thedieshaveit.com
Kim O'Connell http://www.kimoconnell.com 
Lori Brown ---YOU ARE HERE---
Kat Ancheta http://creat-w-kat.com 

Tuesday, January 21, 2014

Creations By AR January New Release Blog Hop

Hello and welcome to the January new release blog hop for Creations by AR! We have a fun new 3-D project for you today as well as a fast & easy card, along with a chance to win the new files as usual.  If you are new to CbyAR files, they come with both SVG and DXF files, as well as a PDF format for those of you who cut by hand.  My projects are all cut on the Silhouette Cameo using Make The Cut! software.

So now, on to the new projects! Up first is a 3-D project, the Lovely Cart.


My cart is currently empty, because I can't decide what to put in it yet! There are plenty of things to choose from though, like a cupcake, some candy, a couple of K-cups for a neighboring coworker, and more.  I decorated mine as a flower cart since I thought that was pretty fitting for Valentine's Day.


To make my flower cart, I used patterned paper and a sticker from Echo Park Paper's Yours Truly collection, along with Close To My Heart cardstock in Ruby and Cotton Candy, and some flowers from my stash. I inked the edges of all of my papers in coordinating inks using sponge daubers that fit on my finger.


I chose this star pattern wheel variation, and added pearl brads from American Crafts to the centers.


I added this sign to the awning using a piece of white cardstock as wide as the sticker I used. I scored 1/2" from the edge, added the sticker, scored at the top of the sticker, then eyeballed the final score line and trimmed the length to another 1/2" past the final score line.  I covered a printed flower image on the sticker with the paper flowers.


Now to put my thinking cap on and come up with something fun to gift in this sweet cart.

Time to move on to a simpler project! This XO Heart Card is a cute little card with two banner options, in a perfect size for classroom exchanges or to leave a little treat for all of your coworkers.
From now until January 28
the XO Heart Card is included with the  Lovely Cart template!
(but it's also available separately)


I am in love with the current fox trend, so I popped one right on the front of my card. I added a blue card base so the colors would feel a little less girly (plus blue is trending in a LOT of Valentine collections this year).


I put him on foam adhesive to stand out a little more from the background. I chose the solid banner piece for my card and stamped a sentiment of my own. I'm planning to use this for my son's class valentines and I'm certain he does NOT want XOXO on any cards he hands out.


I have almost everything cut out for his entire class and they only take a couple of minutes each to put together.  I placed each shape on a different virtual mat in the MTC! software, and duplicated the shape to fill the page. I was able to fit 6 card bases, 20 hearts, or 28 banners on a page.

Supplies for the card are Close To My Heart cardstock in Lagoon and Blush; Laughing Lola patterned paper; Wild About Love stamp set (available February 2014); ink in Sunset,Lagoon, Cotton Candy, and Black; sponge daubers; 3-D foam tape; and a sentiment stamp.

Now, are you ready for your chance to win a set of files for yourself? Just leave a comment on all of the DT blogs and on the Creations by AR Facebook page until Friday, January 24, 12:00 noon Eastern time. One random winner will be announced on January 25 here:


Following is the list of Design Team members participating this month. You'll notice some new faces - the Creations by AR Design Team has grown! Be sure to give our new team members a warm welcome when you visit their blogs.

Thanks for stopping by today and checking us out!

Saturday, January 11, 2014

Design Team Day with Mandie

It's time for another Design Team Day! Today, Mandie from Mandie's Scrappin' has another Laughing Lola project to share with us. Here's a little sneak peek:


Go over and check out her entire project here. And remember, if she inspires you to go shop with me, be sure to click the link that says "Mandie's Scrappin' Invited Me!"

Friday, January 3, 2014

Design Team Day with Mandie

It's time again for Design Team Day, and Mandie has another Laughing Lola project to share with us today. Here's a little sneak peek:


Just a little hint, these cute stamped flowers are going on a fun scrapbook layout. Go check it out over at Mandie's Scrappin' and remember, if she inspires you to go shopping, be sure to click the link that says "Mandie's Scrappin' invited Me!"

Tuesday, December 31, 2013

Cross-Stitch Wishes: January Stamp of the Month Blog Hop

Happy New Year and welcome to our first SOTM blog hop for 2014! If you've come here from the fabulous Mary Eisen, or if you are just starting out, you're in the right place. When we're done here, you'll hop along to the awesome Traci Godbee and see what she has to inspire us this month. In case you get lost along the way, you may want to open up this list of participating blogs (it opens in a new window so you can continue to hop here).

Stitching continues to be a hot trend in papercrafting, and Close To My Heart helps make it easy with this cute set of 13 stamps in Cross-Stitch Wishes. When you want it fast, use it alone for a great cross-stitched look. Want something a little more special? Use the stamps as a pattern to do actual stitching on your project!

I'm sticking with the fast and easy option for now, and I think it looks great. In fact, it was so fast and easy, I made two projects for today, a card and a home decor piece. I have a scrapbook layout in mind, but I need to find the pictures I wanted first! So, up first is my home decor piece:


I made this mason jar wrap to match my kitchen decor. I stamped the flowers on the Sweet Leaf CS with Topiary ink, then stamped them again on Honey, Cotton Candy, and Cranberry CS using coordinating inks. After cutting out the blooms, I sponged the edges of each one with coordinating ink and adhered them with 3-D Foam Tape.


It's more than a plain mason jar. I added a flower frog insert to the mason jar ring so I can use this as a vase. Mason jars are also enjoying a continued run as a hot item for all kinds of uses, so this is a great trendy use of both products.


I fashioned the band corset-style using some eyelets from my stash and some Baker's Twine. This makes it easy to remove if I need to wash the jar, or if for some reason I want to change it.

Now on to my AWESOME (if I do say so myself) card!


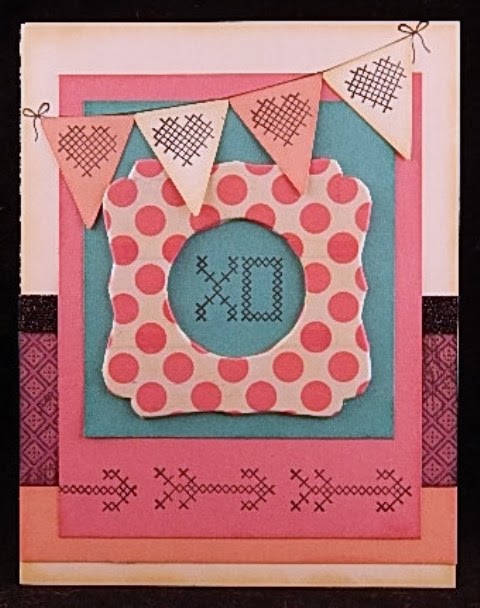
I started with a scrap of Laughing Lola pattern paper and a sketch from Make It From Your Heart Volume 2. I added shades of pink in Cotton Candy and Blush, Colonial White, and Lagoon for contrast. I stamped everything in Black to match the Laughing Lola, and sponged all the papers with coordinating ink (except the Colonial White - I used Champagne for that). I also added a strip of Black Shimmer Trim for bling. The pennants were cut with the Art Philosophy Cricut cartridge.


For this sweet frame, I wrapped a chipboard frame from  with washi tape. (This pattern is sold out, but there are other options - and more coming in February hint, hint) I just overlapped the strips to math the pattern, and trimmed and folded it to wrap the edges.  You can also just sand off the excess tape and ink the edges for a smoother finish, but I liked the wrapped pattern. I then sponged over the whole thing with Champagne ink to match the other pieces.

If you need to shop, any of the following links will take you to a new window. Or if you're ready to move on, I'd love to read your comments before you head over to Traci Godbee's blog.

Saturday, November 30, 2013

Rescued Layout with Special Care - SOTM Blog Hop

Hello and welcome to another fabulous (I'm sure) stamp of the month blog hop! If you've arrived here from Sheila Bennett's blog, or if you are just starting out, you are in the right place. When you're done here, we'll head over to Wendy Coffman's Stamping Rules blog. And if you get lost anywhere along the way, just check this list for the next stop! Our stamp set this month is Special Care, a set of  6 large stamps with all sorts of applications - even one for mailing special packages, lol.

I have a bit of a sad story to go along with my post today.  At some point, one of my kids took a drink into the family room and set it on the sofa table. The same table where most of our scrapbooks live on the lower shelf.  I think we all know what happened next, but unfortunately, I did not know about it for quite some time.  By the time I discovered what had happened, I had about half a dozen layouts with mold growing on them. I know, big frowny face, right?  This is one of the examples right here:


This was a 2-page layout and the other page was not affected. But, since I no longer have anything remotely resembling the paper, stickers, etc., I recreated the whole thing.  Since the pictures were all fine, I just removed them from this layout to use them in the new one. The only thing I was really sad about was all the time it took me to create the background pattern on 2 pages - those "bubbles" are Mrs. Grossman's vellum stickers, you guys! (I know, I am totally dating myself...) BUT, enough crying over spilled whatever.

Here is the long-awaited NEW take on these pictures:

Just click to make it bigger!

Well, my style hasn't changed much has it? I totally "cheat" with sketches All. The. Time. now! This one is from Make It from Your Heart volume 2, and I just switched it up a bit for my pictures. There is no current paper line that matched all of the colors I wanted, so I really mixed things up.
  • The tone-on-tone background is from the former Dream Pop promotion (I do have a couple of these packs left if you're interested, or Lagoon CS would be close.)
  • The yellow pattern is from Babycakes
  • The pinkish-purple pattern is from Laughing Lola
  • And the darker blue is Pacifica CS
Now, some details for you:


 This grouping uses the stamp of the month, Small Sparkles Flourishes, the Babycakes Assortment, a Blue Epoxy Bubble, button from my stash, Baker's Twine Paradise Assortment, and Party Washi Tape. I cut out the stamped image and popped it up using foam tape.


This grouping uses all of the same items listed above, with a different image from the stamp of the month. (I can totally see stamping this on some of my mail!) This image, and 2 others, coordinate with the Art Philosophy Cricut cartridge for a little time savings.


More of the same embellishments for the title area.  I cut the title using a phrase from the Create A Critter Cricut cartridge.

So, that's all for today. I'd love for you to leave me a comment, then let's hop on over to Wendy's Stamping Rules blog and see what she created to inspire us this month!

Saturday, November 16, 2013

Design Team Day with Amber

Welcome to another Design Team Day! Today Amber has a layout for us using Laughing Lola. Here's a sneak peek:


Head on over to Amber's blog to see the entire project. And remember, if she inspires you to go shopping be sure to click the link telling me that "Amber fro Sew-Ink sent me!"

Monday, September 30, 2013

One Sketch Three Ways - October SOTM Blog Hop

Welcome to the October stamp of the month blog hop! If you've arrived here from Helen Onulak's Hooked on Stamping blog, or if you're just starting out here, you're in the right place. After you're done checking out my project, we'll head over to my awesome downline Pamela Ellison's blog, Pam's Clearly Crafty Corner. I'm sure she has something neat up her sleeve for this month.

I personally love this Stamp of the Month, Scandinavian Wishes.  A big chunk of my family heritage is Swedish, so the designs feel familiar to me.  Also, they are pretty versatile, and I am thinking of several ways to use them.  For today's hop, I found I couldn't stop at just one card, so I made three different cards! They all started with the same Mojo Monday sketch, and even though the design is the same I think they all feel pretty different.

First I made a lovely card that is nice if, like me, you have friends of various religions on your holiday card list.


I used Pacifica pigment ink for most of my stamping, and embossed it with Clear Detail embossing powder.  I love the rich color achieved with pigment inks, and the nice shine and quick drying when using embossing powder.  I created a bit of a background for my "Peace" stamp by stamping it multiple times in 2nd generation Pacifica (regular dye-based ink).  I also edged all of my papers in coordinating dye ink with sponge daubers and colored my Color Ready Seam Binding with it also.  The pattern paper is from Babycakes, and cardstock is Pacifica and Honey. Circles & scalloped circles were cut using Art Philosophy and my Cricut.

Here's this weeks Mojo Monday sketch on which I based my cards. (Yes, I was a bit behind making my project this month!)


For my next card, I went with the more traditional red & white color scheme, adding a little silver for sparkle.

I used red pigment ink for the hearts, and again the Clear Detail embossing powder. I used White Daisy pigment ink for the sentiment, and I didn't realize until after I sprinkled on the embossing powder that my stamp pad needed re-inking, so it's not as clear as it could be. Lesson learned - always test the white first! I used White Daisy and Cranberry cardstock, and Silver glitter tape.

Finally, I wanted to do something reminiscent of Swedish folk art, but with an updated twist.


So, I stamped the same heart in Black pigment ink this time, embossing again with Clear Detail embossing powder. Then I colored in the image with alcohol markers. Since the Laughing Lola papers have so many exclusive colors, I just used the markers I have that were closest.  My sentiment is from a discontinued set in my stash, and is stamped in Black pigment ink and embossed.  I added some sparkly Glitter Ribbon from American Crafts from my stash. I also used Black and White Daisy cardstock with the Laughing Lola pattern paper.

I hope you like my ideas for this stamp set. I have a lot of other ideas for the other images in the set as well, so I hope I find more time to play this month so I can share them with you!  I'd love to see your comments, then let's head over to Pam's Clearly Crafty Corner and see what idea she has for us. If you're ready to shop first, head on over to my website now - this link opens in a new window so you can come back here and continue on with the hop at any time!

Sunday, August 11, 2013

Product Comparison - Apples to Pumpkins

I recently had the awesome opportunity to host a House Party sponsored by Paper Pumpkin by Stampin' Up! where my guests and I got to try out the new Paper Pumpkin kits for free. Pretty awesome, right? Since everyone had their own kit to work with, they all got to take home their mini stamp set and ink cube as well as the 4 cute cards they made.


Let me first say that even though I am an Independent Consultant for Close To My Heart, I have always enjoyed SU!'s products as well, and several of their products have a home in my craft room.  That being said, I have to admit that I was a little disappointed in Paper Pumpkin.

Now, unlike some people I've heard from, I actually loved the cute little stamp set that came in our kit. It had three sentiment stamps: a large "seriously" and two smaller "love your guts" and "you kick booty". I thought they were a hoot! The kit also included a Cherry Cobbler Stampin' Spot (ink cube) and all the items (except adhesive and scissors) to make 4 cards of the same design. Some of the pieces were self-adhesive, but not all. I thought the cards turned out pretty cute!


I had to change my card slightly from the design, because a) the smaller strips in our package were larger than on the model photo, and b) the instructions didn't specify how to stamp "seriously" on the bubble sticker to leave enough room for the strip.

The other thing that disappointed me a bit was the price going forward. The kits retail for $19.95 a month, which does include shipping at least, but that's almost $5.00 per card! I don't know about you, but that's not my usual price point! I think I will stick to ordering individual items from my Stampin' Up! rep and skip the Paper Pumpkin kits.

Now, I did say that this was an apples to pumpkins comparison, so of course I had to compare this to a CTMH kit.  I fell in love with the stamp designs in the Laughing Lola card kit as soon as I saw it in the new catalog, and I whipped up all the cards right away!


This kit made 15 cards, 5 each of 3 designs.  It included everything except adhesive, scissors, and ink.  The stamps also coordinate with one of the CTMH Cricut cartridges, but they are all shapes that are super easy to cut with scissors if you don't have the cartridge.

So, to compare prices, I will include the basic shipping cost with this one since it is included in the PP kit price, and I will ignore the Cricut cartridge price, since it is not required to complete the cards. I am not including tax in any calculations because it is different for everyone. There are two cost options here: one with ink pads, if someone is a new customer; and one without ink pads if the customer already had those colors (or something similar in their stash).

The kit itself is $24.95, ink pads are $5.25 each (the kit calls for 4 colors), and basic shipping is $4.95.  So, assuming you need to buy all 4 ink pads, the total cost is $50.90. If you don/t need any ink pads, the total cost is $29.90.  Option 1 has a cost per card of $3.39 and Option 2 has a cost per card of  $1.99.  Either way, I think I did a lot better than $5 per card, and I also had quite a bit of leftover product, including quite a few of the Purple Gems that are exclusive to the kit. 

I already used some of my leftovers on a scrapbook page here, and I'm looking forward to using the rest! Of course, I love the paper colors and patterns so much that I already ordered the scrapbook kit as well, to use with pictures of my teen/tween girls.

OK, before I leave, a quick look at the 3 card designs up close. The kit suggested sanding the edges of the papers in the kit, but I decided instead to do each card design a little bit differently.
This one I sanded as suggested - cute!
This one I distressed the papers with the edge distresser - still neat but not my favorite with this style.
And my absolute FAVORITE - ink sponging with a sponge dauber - LOVE it!!
Now, all that being said, there is a price promotion going on for the Paper Pumpkin right now if you think you want to try it. You can read about it on my friend Sue's website.  And of course if you are interested in any CTMH products, you can always find them on my website!

Monday, August 5, 2013

First Design Team Post - from Mandie's Scrappin'

Hi all! I'm super jazzed to be able to share my first DT Member's post with you today! I'm a little behind, as she actually posted Saturday on her blog, but we had made a trip to the Mall of America for a few days and our hotel's wifi did NOT want to cooperate with me at ALL.  But, better late than never, so here's a little peek of her project:


Mandie used Laughing Lola for her project - this is one of my favorite kits in the new catalog! So head on over to Mandie's Scrappin' to see the whole project and show her some love.

Wednesday, July 31, 2013

Chocolate Lovers Unite! August Stamp of the Month Blog Hop

Welcome to our first blog hop with the new Autumn/Winter catalog! In addition to Chocolate Affair, our fun stamp of the month set, you're sure to see lots of other new things today along the way. If you're here from Mary Eisen's blog, or if you're just starting out, you're in the right place.  When we're done here, you can hop along to Traci Godbee's blog and see what awesome project she made for us this month.

If you love chocolate (and who doesn't?!), then this set of 16 stamps is for you! And this month, it's yours for just the cost of tax & shipping when you spend $50 - awesome, right? And of course, as always, you can purchase it on it's own at full price ($17.95).


I decided to make this fun title page for our 2004 scrapbook (yes, I DO have pictures that old unscrapped). These were the perfect stamps to use with these cute pics of our little girlies enjoying some chocolate cake together. The papers were leftovers from the Laughing Lola card kit (see it here tomorrow), except the extra sheet of Crystal Blue I used as a base.


I made these little embellishments, cutting out the stamped goodies and popping them up on circles with the coordinating saying. I then also popped the circles up off the page.


I stamped on several strips of leftover cardstock from the card kit, using the hostess exclusive stamp set Washi Wonder, with the inks used to make the card kit cards, plus Cotton Candy.  I also added strips of real Washi Tape and silver Shimmer Trim.  I also used the cardstock leftovers to journal, and stamped & cut out the title year, using the new Framework alphabet stamps.

I hope you enjoyed today's project! I'd love to hear your comments, then let's head over and see what Traci Godbee made to inspire us this month.
Related Posts Plugin for WordPress, Blogger...