Saturday, August 31, 2013

Give Thanks - September Stamp of the Month Blog Hop

Welcome to September's stamp of the month blog hop! If you're here from Jill's Scrap Wench blog, or if you're just starting out, you're in the right place. When  we're done here, let's head over to I Am A Happy Stamper and see what Dawn created for us this month.

Fall will soon be here and I am already getting excited for my favorite season! I love the cooler weather, the great outdoor photo ops, and all of the time we get to spend with family. So when I first saw this month's stamp of the month, I knew right away which stamp I was going to use first. The only real decision was what project to make with it first!


And it was absolutely perfect for this layout! I have to say that if every layout I made could be this beautiful, I would be the most happy scrapper in the world! Of course as usual I started with a sketch, this one from Volume 2 of Make It From Your Heart. I changed it up a bit to fit my pics, but the starting point of a sketch speeds up a ton! On to the details that make me love it so much:


Here is that wonderful stamp. To highlight my theme, I stamped it a second time in my contrasting color, made it into a little banner strip, and popped it up on 3-D Foam Tape.  I added some small sparkles (that came in the Huntington workshop on the go kit) to the ends of the banner as well.


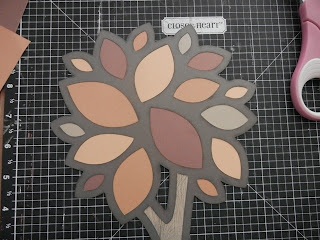
I cut this tree from the new Artbooking Cricut cartridge at Fit To Page, which cut the Cocoa brown outlines.  I then stamped on Desert Sand CS using Cocoa ink and the woodgrain stamp from the workshop on the go kit. I cut it by hand to near the size of the tree trunk, adhered the Cricut cut to it using the Bonding Memories Glue Pen, and cut it to size by hand. To see how I cut and laid out the leaves, be sure to check out my mini tutorial at the end of this post.  I added more Sparkles here because I kind of got hooked!


My title is also cut from the same page of the Artbooking cartridge, hand cut more leaves, and added more Sparkles and embellishments. I should point out here that I sponged the edges of all of my papers (except the leaves on the tree because the edges don't show) with matching inks and Sponge Daubers.


I made some photo corners using a punch I have in my horde of tools to pull in a little more of the pattern from the left edge of the layout. Then I tossed on some more leaves, Sparkles, and embellishments.

If you want to skip the tutorial, I'd love to hear what you think, then head on over to I Am A Happy Stamper and keep on hopping!

Now, how to do the tree leaves:
1. Flip tree outline upside down, placing your scrap paper underneath, and trace a leaf.

2. You should have this. Cut around  it, leaving a small border wide enough to glue with the glue pen and narrow enough that two leaves will not overlap.

3. Draw a thin line of glue around the open space of the leaf.

4. Glue leaf down so that pencil line faces you. That way if it isn't lined up perfectly, the line won't show on the front.

5. Repeat in a triangle pattern using different colors until tree is full of leaves. (See how I laid out 3 orange in a triangle pattern, then moved on to the red...)

I filled in the smallest leaves last, trying to make sure no leaves next to each other were the same color. This "random" effect is really a pattern, which makes it easier to achieve the random look we want.

If you're interested in knowing what products I used, here's a handy list (links open in a new window):
Thanks so much for stopping by! I'd love for you to leave me a comment before you go, then let's visit Dawn at I Am A Happy Stamper and see what she created.


Thursday, August 29, 2013

So Happy Together

Well, so much for having more time once the kids went back to school! It would probably help if I didn't get sick right away, but so be it. I did have time to make a layout a bit ago that I'd like to share.  I belong to a fun group on Facebook called Croppin' Chicks, and they are posting sketches weekly for us to work with.  This one is from a couple of weeks ago, and I really liked the design. I also got to scrap my kitty-boys, which is super fun because not only are they really cute, they are both "neutral" colored so I can use whatever paper I want!


I actually decided to use the For Always paper pack and MyStickease because I thought the black & white designs would look really cool with the kitties.  I decided to use the Lagoon (yes, that blue is bright turquoise - I need a better setup for taking scrappy pics!) and Honey colors from the kit along with some matching embellishments. I decided to add a ruffle with the For Always Textiles, which might be a little girly for boy cats, but hey, they are cats, what do they know?


I thought this sticker was the perfect title for my layout! These two boys would not be nearly as happy without each other. I added a couple of colored sparkles for interest.


Here's the fabric ruffle. I just laid down some Scor Tape and finger-ruffled the fabric strips I cut. I left the edges unfinished, and covered the top edge with a border sticker popped up on 3-D foam adhesive.


My embellishments are just stickers from the MyStickease pack layered with 3-D embellishments for dimension.


The sketch called for strip journaling, which is not usually my thing, but worked well for this layout where I didn't have a lot to say.

If you're interested in the products I used, here's the list:
Thanks for taking the time to check out my layout today! I'd love to hear what you think of it.

Thursday, August 22, 2013

In the Zone... the Silly Zone

Hello! I have another share for you today from my final Design Team member! Lisa has a great use today for our ProPlayer kit.


She added these letters from her stash and it completely changes the theme of the kit. Head on over to Lisa's blog to see the whole thing and show her some love! See you next time!

Saturday, August 17, 2013

Sentimental Mojo

I needed a sympathy card this week, which is always a challenge for me, so I decided to use some actual challenges to help me out.  For the second week in a row, I decided to combine the sketch from Mojo Monday with the Sentiment-ally Yours challenge from Heart2Heart.


Here's the sketch:

 The papers I used are from the new Frosted line from Close To My Heart. It is a Winter themed kit, but I just used the more generic sides of the patterned papers. The one piece I used that had snowflakes on it, I used as a scalloped mat to my large center circle, so you don't really see them.

My scalloped circle was cut with a Sizzix die.  The plain circles and the leaves are Spellbinders dies. And the rectangle mat was cut using my Perfect Layers.


I sponged all of my edges using coordinating inks and sponge daubers. The sentiment piece was sponged with the die still in place to leave the border bright and crisp.  The sentiment stamp is from the Words of Comfort stamp set from CTMH.  The pearl brad and glitter ribbon are both from American Crafts, and the flowers are from my stash.


On the inside, I added strips of paper to match the inside and stamped another sentiment and a small flower from the same Words of Comfort stamp set.

If you have some time, I encourage you to go play along at both of these challenge blogs. No matter what the challenge is, you're sure to enjoy it!

Thursday, August 15, 2013

Attend Scrapbook Expo for a Good Cause!

Next weekend the Scrapbook Expo comes to the Chicagoland Area. August 23-24, 2013, scrapbookers, rubber stampers and paper crafters will converge on Pheasant Run in St. Charles, IL for the annual event. For my friend Betsy, the Scrapbook Expo is also a chance for her to do good.

Betsy is involved in a group called Shoebox 1k. This group helps to pack shoebox gifts filled with; school supplies, personal hygiene items, toys, a stuffed animal, hard candy and more. These boxes are then sent to needy children all over the world  along with the good news of God’s love, through an organization called Operation Christmas Child. Last year Betsy and her group packed over 1200 shoeboxes that were then distributed to Uganda, Madagascar, and the Philippines.

At the Scrapbook Expo in addition to running the baggage check area, Shoebox 1k also holds “basket raffles.” Manufacturers and businesses  have donated over $1000 in prizes to be given away. Tickets can be purchased for $1 each or buy 10 get 2 free and are available at the Baggage Check booth at the Scrapbook Expo that weekend. All money raised goes to help purchase items for the shoeboxes and cover delivery costs.

 I am one of Betsy's sponsors for this event, providing a gift basket full of awesome Close To My Heart goodies! In addition to my gift basket you will find baskets from these wonderful sponsors:  Archival Inn, Cafe’ Crop, Chicagoland Scrapbooker Magazine, Craftwell, Creative Memories Consultant RuthAnn Lewckyj, Creative Options, Genuinely Jane Studios, Hydrangea Hippo, JoAnn’s Creations, Linnie Blooms, Pampered Chef Consultant Shirley Van De Wedge, Peddler’s Den, Robin’s Nest, Scrap Addict for Life, Scrap-It Girl, Tim Holtz, Wild Tree Organic Consultant Dot Alcorn, Xyron, and MORE!

To help promote this fabulous cause Scrapbook Expo has generously donated 2 pairs of tickets for us to give away to a couple of Chicagoland Scrapbooker Magazine readers.


 What do you have to do to win? Check out the Rafflecopter giveaway for all the ways you can enter! Two winners will be selected at random to win a pair of tickets for free admission to the Scrapbook Expo.

a Rafflecopter giveaway
A big thank you to Scrapbook Expo for their generous donation. To learn more about the Shoebox 1k project or the basket raffle event at the expo, visit Betsy’s blog Aim Happy and click on “Shoebox 1k” or “Events” at the top menu.  Good luck to everyone!

Monday, August 12, 2013

Introducing Babycakes with Amber

Hello! Today, Amber over at Sew-Ink is ready to reveal her first creation using the Close To My Heart Babycakes Workshop on the Go kit.


And based on the beautiful "baby" in this sneak peek she gave me, we are in for a treat! And for sure a lesson in unexpected uses of themed paper, lol.  I can't wait to see her entire project, so let's head over to Sew-Ink and see what she made!

And if her project today inspires you to go shopping, be sure click the join link at the end of your order where it says "Amber from Sew-Ink sent me!"


Sunday, August 11, 2013

Product Comparison - Apples to Pumpkins

I recently had the awesome opportunity to host a House Party sponsored by Paper Pumpkin by Stampin' Up! where my guests and I got to try out the new Paper Pumpkin kits for free. Pretty awesome, right? Since everyone had their own kit to work with, they all got to take home their mini stamp set and ink cube as well as the 4 cute cards they made.


Let me first say that even though I am an Independent Consultant for Close To My Heart, I have always enjoyed SU!'s products as well, and several of their products have a home in my craft room.  That being said, I have to admit that I was a little disappointed in Paper Pumpkin.

Now, unlike some people I've heard from, I actually loved the cute little stamp set that came in our kit. It had three sentiment stamps: a large "seriously" and two smaller "love your guts" and "you kick booty". I thought they were a hoot! The kit also included a Cherry Cobbler Stampin' Spot (ink cube) and all the items (except adhesive and scissors) to make 4 cards of the same design. Some of the pieces were self-adhesive, but not all. I thought the cards turned out pretty cute!


I had to change my card slightly from the design, because a) the smaller strips in our package were larger than on the model photo, and b) the instructions didn't specify how to stamp "seriously" on the bubble sticker to leave enough room for the strip.

The other thing that disappointed me a bit was the price going forward. The kits retail for $19.95 a month, which does include shipping at least, but that's almost $5.00 per card! I don't know about you, but that's not my usual price point! I think I will stick to ordering individual items from my Stampin' Up! rep and skip the Paper Pumpkin kits.

Now, I did say that this was an apples to pumpkins comparison, so of course I had to compare this to a CTMH kit.  I fell in love with the stamp designs in the Laughing Lola card kit as soon as I saw it in the new catalog, and I whipped up all the cards right away!


This kit made 15 cards, 5 each of 3 designs.  It included everything except adhesive, scissors, and ink.  The stamps also coordinate with one of the CTMH Cricut cartridges, but they are all shapes that are super easy to cut with scissors if you don't have the cartridge.

So, to compare prices, I will include the basic shipping cost with this one since it is included in the PP kit price, and I will ignore the Cricut cartridge price, since it is not required to complete the cards. I am not including tax in any calculations because it is different for everyone. There are two cost options here: one with ink pads, if someone is a new customer; and one without ink pads if the customer already had those colors (or something similar in their stash).

The kit itself is $24.95, ink pads are $5.25 each (the kit calls for 4 colors), and basic shipping is $4.95.  So, assuming you need to buy all 4 ink pads, the total cost is $50.90. If you don/t need any ink pads, the total cost is $29.90.  Option 1 has a cost per card of $3.39 and Option 2 has a cost per card of  $1.99.  Either way, I think I did a lot better than $5 per card, and I also had quite a bit of leftover product, including quite a few of the Purple Gems that are exclusive to the kit. 

I already used some of my leftovers on a scrapbook page here, and I'm looking forward to using the rest! Of course, I love the paper colors and patterns so much that I already ordered the scrapbook kit as well, to use with pictures of my teen/tween girls.

OK, before I leave, a quick look at the 3 card designs up close. The kit suggested sanding the edges of the papers in the kit, but I decided instead to do each card design a little bit differently.
This one I sanded as suggested - cute!
This one I distressed the papers with the edge distresser - still neat but not my favorite with this style.
And my absolute FAVORITE - ink sponging with a sponge dauber - LOVE it!!
Now, all that being said, there is a price promotion going on for the Paper Pumpkin right now if you think you want to try it. You can read about it on my friend Sue's website.  And of course if you are interested in any CTMH products, you can always find them on my website!

Wednesday, August 7, 2013

Bon Voyage Mojo Monday!

OK, so technically Mojo Monday isn't going anywhere. I just decided to combine this weeks sketch with the Bon Voyage challenge over at Heart2Heart this week.  And this is what happened:


I thought this would make a nice card for someone going on a cruise - maybe a honeymoon? Or a birthday card for someone who likes to cruise, or maybe even a Navy man. At any rate, I really like the way it turned out!

I used papers from both the Tommy and Surf's Up paper packs from CTMH, some twine, and a favorite retired stamp set called Horizon.  I also got to try out my new Perfect Layers tools - they sent me a set to try and I fell in LOVE!

I have to admit that I was skeptical of the usefulness when I first saw them, but I was converted with my first use. I really like to add mats to my images, or a nice border like around the lighter pattern above, to help set it of from the background.  But I always have trouble getting things lined up evenly all the way around, especially these super skinny 1/16" borders. And I hate for things to be less than perfect!

If you're interested, this is how easy the ruler tools are to use:
Step 1: adhere your image (or paper) to the cardstock you want as your mat.
Step 2: Choose your border size, catch the appropriate lip on the edge of your image, and trim using the tool and X-acto knife. (There are markings for both right and left-hand use.)
Step 3: Rotate the image and repeat for the remaining sides, until you have a perfectly matted image.

The Perfect Layers tools come in a set of three, so you can create borders from 1/16" all the way up to 1". And they have even given me a code so you can get 5% off your entire order. You can visit the site here to see more details on the tools, and if you order just enter the code LoriB5% to get 5% off your order.

Here's a closeup of the matted paper on my card:

And finally, here's a closeup of my image, popped up on foam tape over the twine:
I used the same X-acto knife to cut a slit in the card fold to run the twine around the entire card front a couple of times. I used some direct-to-paper ink on the edges of all the papers except the one I matted. I wanted the extra definition between it and the light paper behind it, so the mat made more sense.

I'd love to hear what you think of today's card. And if you decide to play along at H2H or Mojo Monday be sure to let me know so I can come see your take on things!


Monday, August 5, 2013

First Design Team Post - from Mandie's Scrappin'

Hi all! I'm super jazzed to be able to share my first DT Member's post with you today! I'm a little behind, as she actually posted Saturday on her blog, but we had made a trip to the Mall of America for a few days and our hotel's wifi did NOT want to cooperate with me at ALL.  But, better late than never, so here's a little peek of her project:


Mandie used Laughing Lola for her project - this is one of my favorite kits in the new catalog! So head on over to Mandie's Scrappin' to see the whole project and show her some love.

Friday, August 2, 2013

Meet the Design Team!

OK, I know I said I would post the Laughing Lola card kit yesterday, but I decided I had a full product comparison I wanted to do, so I think that's waiting until next week so I have time to get ALL of the details correct.  But I DO have an awesome post to keep you occupied today - I want to introduce you to my 1st-ever brand-spanking-new Design Team!!  These ladies are going to help me keep you inspired all month long for the next 6 months.

I can't wait to see what they do with the Close To My Heart products I sent to them to work with (plus any other products they want to add). But until they are ready to share, check out their stories and go visit their blogs! They'll post their projects on their own blog each month, and I will notify you here so you're sure not to miss it.  Now without further ado, here are the 3 members of my first-ever Design Team:

Hi my name is Lisa, I have been an avid papercrafter for the last 15 years. My first love is creating layouts for my family's many albums, but I am also very involved in sharing my love of papercrafts through my church's card ministry and teaching papercrafting to children and women in various settings. I love inspiring others to adopt this meaningful life long hobby! I am excited to be part of Lori's team and look forward to sharing my work with you! You can find more of my work on my blog: My Creative Endeavors (http://createdbylisa.blogspot.com)


 Hi, I'm Mandie and I've been a scrapbooker/papercrafter for the last 7 1/2 years. I was given a basket of scrapbook supplies at my first daughter's baby shower and I haven't looked back since! I love learning new things and there is always something new in the papercraft industry! I am a Certified Paper ED instructor and I am an Intermediate Certified Copic Instructor as well. I love sharing my paper passion with others and am grooming my Girl Scout troop to preserve their memories as well! I have been using Close to My Heart papers and stamps almost since I began scrapbooking and I love the on-trend designs that are still timeless for my scrapbooks. I'm so excited to be on Lori's team and hope you will come check out more of my work on my Blog: http://mandiesscrappin.blogspot.com


My name is Amber Rasmussen, I am 29 and I live in Florence, Arizona with my High School sweetheart Jason. We have been together for 14 years now and have a cute little dog named Lexis and a black cat named Pookie. I have been scrapbooking/papercrafting for about 8 years. I started with paper embroidery but now I create everything from cards, to 12x12 layouts and mini albums. I am an avid cardmaker and scrapbooker and like to explore different styles but if I had to describe my crating style I would say its Clean & Simple but Fun & Cute. There isn't a material or technique I won't try at least once! Visit my blog at http://sew-ink.blogspot.com/

Related Posts Plugin for WordPress, Blogger...