Fall will soon be here and I am already getting excited for my favorite season! I love the cooler weather, the great outdoor photo ops, and all of the time we get to spend with family. So when I first saw this month's stamp of the month, I knew right away which stamp I was going to use first. The only real decision was what project to make with it first!
And it was absolutely perfect for this layout! I have to say that if every layout I made could be this beautiful, I would be the most happy scrapper in the world! Of course as usual I started with a sketch, this one from Volume 2 of Make It From Your Heart. I changed it up a bit to fit my pics, but the starting point of a sketch speeds up a ton! On to the details that make me love it so much:
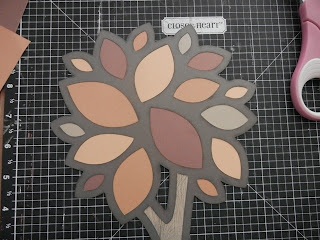
I cut this tree from the new Artbooking Cricut cartridge at Fit To Page, which cut the Cocoa brown outlines. I then stamped on Desert Sand CS using Cocoa ink and the woodgrain stamp from the workshop on the go kit. I cut it by hand to near the size of the tree trunk, adhered the Cricut cut to it using the Bonding Memories Glue Pen, and cut it to size by hand. To see how I cut and laid out the leaves, be sure to check out my mini tutorial at the end of this post. I added more Sparkles here because I kind of got hooked!
My title is also cut from the same page of the Artbooking cartridge, hand cut more leaves, and added more Sparkles and embellishments. I should point out here that I sponged the edges of all of my papers (except the leaves on the tree because the edges don't show) with matching inks and Sponge Daubers.
I made some photo corners using a punch I have in my horde of tools to pull in a little more of the pattern from the left edge of the layout. Then I tossed on some more leaves, Sparkles, and embellishments.
If you want to skip the tutorial, I'd love to hear what you think, then head on over to I Am A Happy Stamper and keep on hopping!
Now, how to do the tree leaves:
1. Flip tree outline upside down, placing your scrap paper underneath, and trace a leaf.
2. You should have this. Cut around it, leaving a small border wide enough to glue with the glue pen and narrow enough that two leaves will not overlap.
3. Draw a thin line of glue around the open space of the leaf.
4. Glue leaf down so that pencil line faces you. That way if it isn't lined up perfectly, the line won't show on the front.
5. Repeat in a triangle pattern using different colors until tree is full of leaves. (See how I laid out 3 orange in a triangle pattern, then moved on to the red...)
I filled in the smallest leaves last, trying to make sure no leaves next to each other were the same color. This "random" effect is really a pattern, which makes it easier to achieve the random look we want.
If you're interested in knowing what products I used, here's a handy list (links open in a new window):
- Poster Tidings, September stamp of the month
- WOTG Huntington Scrapbooking Kit
- Extra cardstock in Goldrush and Autumn Terracotta
- Cricut Artbooking cartridge
- Coordinating ink pads (I used Cocoa, Barn Red, Autumn Terracotta, Goldrush, Slate, and Cashmere)
- Sponge Daubers
- Bonding Memories Glue Pen
- 3-D Foam Tape
- Mini-Medley Accents Wooden Collection


I love the sentiment stamp and the way you made the layout look like you framed it! I'm a new follower.
ReplyDeleteLove this LO Lori!!! The tree turned out soooo cool! I totally want to scraplift you :)
ReplyDeleteThis is beautiful! Love the tree, what a cool effect!
ReplyDeleteGorgeous layout, love the colors and that tree is lovely!
ReplyDeleteWonderful pages!
ReplyDeleteThis is gorgeous!
ReplyDeletereally beautiful. Great work!
ReplyDeleteGREAT tree tutorial!
ReplyDeleteVery nice page with the tree and how you highlighted the word 'family'
ReplyDeleteGorgeous!
ReplyDeleteWonderful pages, love the tree and sentiment.
ReplyDeleteWow! Love the colors, love the layout. TFS!
ReplyDeleteThat tree really makes the LO come alive! Love all the details like the woodgrain stamping on the treetrunk and all the sparkles. Love it!
ReplyDeleteWhat a super layout!! A lot of detail but worth it in the end!!
ReplyDeleteWow! Beautiful layout!
ReplyDelete