Tuesday, January 31, 2012

Thoughtful Tidings from Stella - February Stamp of the Month Blog Hop

Hello and welcome to the February Stamp of the Month blog hop!  And I'm sharing another of the fabulous new collections from Close To My Heart today as well...  If you've arrived here from Krista's Simply Creating Together blog, or if you're just starting out, you are in the right place.  And once we're done here, you'll move along with Jen Rubio and see what she has created for us.

Now, on to the hop!  Thoughtful Tidings is a set of 11 stamps full of messages greatly suited to all kinds of cards or scrapbook pages, with several suggested coordinating Cricut cuts from the Art Philosophy cartridge.  Check it out! >>>

Here's the first thing I've created with this stamp set:


Now, you MAY have noticed that I used a Cricut cut for my stamped sentiment, but not the one shown on the carrier sheet with this image.  I wanted it to coordinate with the shape of our new Colonial White Die-Cut Cards & Envelopes.  If you want to try a different shape but aren't sure about it, just use some scrap paper, find a cut shape you like, and start with the suggested size on the carrier sheet.  If it doesn't work, just try different sizes and/or shapes until you get a result you like!  I also cut a border with an edge similar to the card flap & Cricut shape I used.  This particular border had some designs in it so it was not a solid border.  Using my Cricut Gypsy, I hid all of those extra cuts so I got only the outline.  I did that because I was using pattern paper and it didn't want it to be too busy.  Don't have a Gypsy or Cricut Craft Room?  Just cut the border from solid cardstock and it would look fine!

I would also like to point out the lovely flower stamp that I paper pieced for this card, and the rope broder image on the card flap.  They are from the stamp set that comes only in the Pemberly Workshop on the Go.  See how great they look with this paper?  Don't feel like those WOTG stamp sets are only good for the papers they come with!  They can be used with all sorts of things.

Finally, please allow me to introduce you to Stella, a colorful beauty who's geared up for all sorts of adventures!  Here's some beautiful artwork created by our Corporate designers:
And that artwork only shows one side of each of the three papers - there are 3 more fabulous designs to choose from!  And that's true of every collection from CTMH - if there happens to be one design you don't care for (and I will tell you that there is one in this collection that I don't care for, a rarity for me), the other side is likely to thrill you!

All of the items I showed are available on my website beginning February 1:
  • S1202 Thoughtful Tidings, $17.95 (or only $5 with any $50 purchase) - available only until February 29
  • X7147B Stella Paper Packet, $9.95
  • G1033 Pemberly Workshop on the Go (stamp set), $29.95
  • Z1738 Colonial White Die-Cut Cards & Envelopes, $6.95
  • Z1338 Sunset Mini-Medley Accents, $4.95
  • Z1686 Art Philosophy exclusive Cricut Collection, $99.00
Thanks for visiting with me today!  Now it's time to hop along and visit with Jen Rubio; let's go find out what she has created for us...

Monday, January 30, 2012

Meet Pemberly - Sneak Peek and a 3-D Stamped Flower Tutorial

Today I'd like to introduce you to a pretty girl named Pemberly, a brand new collection from Close To My Heart coming February 1, 2012.  This beautiful collection features florals in blues, yellows, tans, and creams; it's sure to make your projects look great!  Here's my first project using my favorite collection in the new catalog:


I based my card design on the 6"x6" Diamond Stack pattern in the Originals card design book, and modified it for the papers and stamps I chose to use.  I created the flower focal image using an easy technique requiring only a pair of micro-tip scissors and a craft knife. 

Here's a video tutorial showing how to do it:

Here is some more beautiful artwork created by the creative artists at Close To My Heart.


There are two options for supplies I used to create the card.  The new Pemberly items and stamp set will be available beginning February 1 on my website; other items are currently available.  Option 1 is what I bought for myself, or already owned:
  • G1033 Pemberly Workshop on the Go kit, $29.95 (contains the paper packet, Bouquet Assortment floral embellishments, Bitty Opaques pearl adhesive gems, exclusive workshop stamp set, and instruction booklet - see above video)
  • C1494 Card Word Puzzle stamp set, $13.95
  • craft knife of your choice - try Z1252 Cutting Knife, $4.95
  • Z534 Micro-Tip Scissors, $9.95
  • 9032 Originals Card Confidence Program, $21.95

Option 2 is only the exact items used on the card:
  • X7148B Pemberly paper packet, $9.95
  • Z1707 Bitty Opaques pearl adhesive gems, $2.95
  • C1494 Card Word Puzzle stamp set, $13.95
  • craft knife of your choice - try Z1252 Cutting Knife, $4.95
  • Z534 Micro-Tip Scissors, $9.95
  • 9032 Originals Card Confidence Program, $21.95
Note: Other products are also available which coordinate with the Pemberly collection, including MyStickease adhesive cardstock embellishments, ribbons, and more.

Hope you enjoyed meeting Pemberly as much as I did!  Thanks for stopping by today; I hope to see you again soon.

Thursday, January 19, 2012

Using Heavily Patterned Paper as a Background

Many times, I have struggled with how to use a beautiful patterned paper without either overpowering the rest of the project or losing the effect of the images on the paper.  I've found what I think is a good way to solve this issue, and wanted to share  it here.

Yes, I made this beautiful layout for pics of our cat!  
 This is the type of paper I struggle with - oversized images, beautiful "scenes", etc.  The images on this paper are so large, I didn't want to cut it down and use parts of it because it would lose the effect.  Solution: use it as the background.  HOWEVER, it's difficult to do this without it overpowering your photos, so there are tricks to use to BALANCE everything out.

First, a note.  I had two sheets of this awesome paper because this is from the Dreamin' collection from Close To My Heart; their paper packs always come with 2 of each pattern.  If you are working with another brand that has only single sheets, I will let you know how to work with that...

OK, how do we achieve balance?  In art, we talk about the visual "weight" of images.  This patterned paper is "heavy", so we need to balance it with a large chunk of solid color.  This is achieved by using a large block of cardstock as a mat for the entire area where we will have pictures, embellishments, etc. The color of the cardstock should be a color that is not heavily used in the pattern, but is there.  This is why I chose the orange/gold color as opposed to a blue shade.  (If you have only one sheet of pattern, you won't make an actual mat.  You will cut the pattern vertically into two pieces, like 8" and 4" wide.  Then layer them on a full sheet cardstock at the outer edges making the center your "mat.)

Next, to prevent a hard line, you want to transition from the solid to the large pattern for a smoother, softer feel.  This is accomplished by the introduction of some smaller patterns in coordinating colors.  Because my pattern was very dark on one side ad very light on the other, I introduced a small bit of the dark color on the light side by using a small strip of blue pattern.  Again, this helps to achieve balance because dark colors appear "heavier" than lighter colors.  Finally I framed in my mat with the same pattern on both sides.  The circles pattern is actually from a "zip strip" from one of the papers in the Dreamin' collection, and the scalloped piece is from the coordinating MyStickease cardstock stickers.  (If you are using one sheet of pattered paper cut down, make sure you leave these strips the full 12" length instead of cutting them down like I did.)

Now, when adding your photos, you can give even more weight to your matted area by matting the photos in a complementary color that will also help your photos stand out.  I also used some dark, coppery embellishments to pull in more of the brown from the pattern and to help pull the eye across the page.   One quick word about color - because my photos were rather monochromatic, I chose this simple blue/orange/neutral color scheme.  I knew I would want blue photo mats to help my golden-toned photos stand out more, so I chose the patterned paper from there.  It's much easier to get the effect you want if you start with your photos and work your way to the patterns last.

Supplies used in this project from Provocraft:
  • Cricut Expression
  • Opposites Attract cartridge
  • Cricut Gypsy (to weld letters)
Supplies used in this project from Close To My Heart:
  • Dreamin' collection Paper Pack and MyStickease  (available only until January 31)
  • Harvest Charms (available only until January 31)
  • Canvas Badge Buttons
  • Cork Color-Ready Alphabets (I left mine plain)
  • stamp pads in Goldrush, Chocolate, and Outdoor Denim
  • On This Day stamp set (date on lower left)
  • Treasure Life stamp set (flowers on badge button)
  • copper frame & corners (no longer available)
Thanks for stopping by today.  I hope to see you here again soon!

Wednesday, January 18, 2012

"Lucy" Sneak Peek for Mojo Monday and CR84FN

We all know that the retail craft manufacturers are getting ready for CHA and publishing sneaks of new products on their blogs and websites.  Since Close To My Heart isn't a retail manufacturer, they don't show at CHA, so I thought I would use some soon-to-be-released products for the current Mojo Monday challenge (224) and CR84FN color challenge (46).  You can play along with both of these challenges too; just head over to their sites and check out the rules!

As soon as I saw CR84FN46 color challenge, I said "Hey, Lucy would be perfect for that!"  So this morning I pulled out some goodies and made a card using this week's Mojo Monday 224 sketch.  You can see the color inspiration and the sketch to the right.  Lucy, and the other new products I used, will be available beginning February 1, and you can shop right on my website.  If you prefer a more personal touch, or need a paper catalog, just drop me an email with your phone number and the best time to call.

Here's what I ended up with this week:

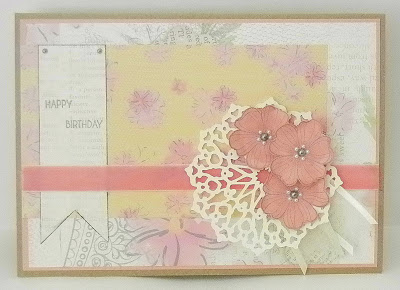
I love the soft colors and feminine details in this collection!  Great for weddings, birthdays, baby girls, and more.  I went with a birthday card, since I seem to need those a lot, using the word and flower stamps from the new Card Word Puzzle stamp set.  I cut the flowers out by hand, sponged on some additional Blush ink, added Licorice Opaque Pearls and new Bitty Pearls to the centers.  Then I finger curled the flower petals before attaching them to the card.

Isn't that doily beautiful?  That was cut with the Art Philosophy Cricut cartridge, exclusive to Close To My Heart.  Look how fabulously it cut all those little details!  I LOVE this cartridge more every time I use it.

Here's a little detail shot of the doily and flowers so you can see the finished piece better.  I used 3-D foam adhesive to pop the doily up above the ribbon, and the center flower above the other two.

All products except ribbon are from Close To My Heart.  The pink velvet ribbon is American Crafts and the ivory ribbon is from my stash.

Want to see some more?  Here's a little preview of more projects created by the Close To My Heart art department:

This One's For the Rest of Us...

If you're one of those people who's "all caught up" with your scrapbooking, you can probably just stop reading here (so the rest of us can all complain about you, lol).  For the rest of us, I wanted to share a layout and a little news/reminder.  As usual, I'm pulling out pictures from a couple of years ago...


I created a scene with rubons. (YES, on patterned paper!)
The sad thing is that I have probably two more layouts I need to do for the same year... I have a few detail shots I'll stick in while we're moving along, but I know you want me to cut to the chase.  So, here's the reminder (or news for those of you that didn't know).  If you're like me and work on layouts at any time of year, you can't rely on being able to get the papers you want when you are ready.


Add dimension with a felt shape on top of similar paper.
We're all starting to get excited about all of the new products coming out soon, but we need to make sure we get current items we need before they are no longer available.  The items used in this layout are some of those - the Mischief papers & rubons , as well as the Midnight felt shapes are only available through January 31.  They're not the only things - the new Close to My Heart catalogs are "live" beginning February 1, so a whole host of products are going away.

Here are the main items from Close To My Heart that are going away:
Wonderland

Believe

Mischief
Dreamin'
Also leaving are the Sophia, Fanfare, Mayberry, and Lucky collections, along with their coordinating specialty embellishments.  Many stamp sets will be discontinued as well - if there is something in particular you are wondering about, just ask me.  If you see something here you NEED to have, I'm happy to hook you up!  You can shop online 24/7 on my website, or if you prefer a more personal touch, just drop me an email with your phone number and the best time to call.  If you're shopping online, don't forget to check out that While Supplies Last category; there are lots of discounted items there starting at just $1!

Thanks for stopping by today.  I hope to see you back here again soon! I see my number of Followers and email recipients has creeped up a little bit more, so I will be having some giveaways coming soon - be sure to check back!

Tuesday, January 17, 2012

Pizza Time with A Boy's Life from Echo Park Paper

I was lucky enough to be a winner of Echo Park Paper's holiday card contest and got to choose a collection of my choice.  Of course I HAD to have the new A Boy's Life collection!  I finally got to put some to use this weekend and I am IN LOVE!  I just know I am going to need more of this paper once it's in my favorite store... Here's the first layout I finished with it:


There are so many great patterns to mix & match in here!  They were perfect for this simple sketch from one of the Sketches for Scrapbooking books from Scrapbook Generations, and the colors were super easy to coordinate with cardstock and markers from Close To My Heart.


I cut stars from an additional pattern as well as Sunset cardstock using the Art Philosophy Cricut cartridge from CTMH, and combined them with several star stickers from the collection for a fun embellishment group.  I also added some faux stitching to my pattern squares using my CTMH ruler and piercing tool, plus some markers in Sunset and Outdoor Denim, and a white Uniball Signo gel pen.


And I layered the cardstock and pattern paper using the same cuts for a couple of the stars.  Popping some up on the 3-D foam adhesive is a great way to add even more dimension.  I also distressed the edges of the pattern squares for added dimension and a more boyish look.


I finished it all off with a simple title using the alpha stickers in the collection and some more Sunset cardstock - SO easy!

Here's a list of supplies I used in this layout.

Echo Park Paper:
          A Boy's Life collection kit

Close To My Heart:
  • Cardstock and Markers in Outdoor Denim, and Sunset, and White Daisy cardstock
  • Art Philosophy, exclusive Cricut cartridge
  • ruler
  • piercing tool
  • Versamat
  • 3-D foam adhesive
  • edge distresser
Other:

Wednesday, January 11, 2012

Use Lace Challenge from Scrappy Frog's

I'm a few days late posting this to my blog - getting back into school schedule mode has been a little rougher than anticipated! This month's challenge at Scrappy Frog's Challenge Blog is to use lace.  I used some crocheted lace, and did a little something different with it.  Here's my entire layout:


There are so many style option with the Happy Days collection from Echo Park Paper, it seems like I can just keep making things that look "new"!  The fun retro patterns and bright colors go great with all of those "little kid" pictures I'm trying to catch up on.  This is my almost 11yo daughter, about 9 years ago, beginning her art "career".  (She is becoming a pretty accomplished cartoonist, so I'm very glad to have captured this!)  For a girly feel, I grabbed the small flower print paper from the collection, and add the mini polka dots and just a bit of the stripe.  Sticking with the retro feel, I cut my title with my Cricut from the Nifty Fifties cartridge and added some of the mini alpha stickers from the collection.
I wanted to add a journaling block to my layout, but the flower ones in the collection weren't colors I wanted to use, so I picked the one with the big green car on it and just used embellishments to cover up the car.


I used some of the flower stickers in the collection, along with some flowers cut with the Cricut and a flower made with gathered crochet lace.  I just threaded some bakers twine through the holes in the lace and pulled it until I could gather it into a loose circle.  I threaded the leftover twine through a button and tied it into a bow, and used that for my flower center.  The sentiment at the top of the journaling card is stamped, and the rest is stickers from the collection.

Items available at Cutters Creek:
Items available from Close To My Heart:
Other:
  • Bazzil cardstock in Dragonfly
  • brads

Thursday, January 5, 2012

Birthday Dreams - Mojo Monday 222

My resolution for this year is to scrap more often, which I haven't done yet, but I also want to continue using my smaller bits for some great cards.  As luck would have it, my son turns 7 next week.  I don't know where the time has gone, but he is fast becoming a "big kid" instead of my little guy.  So, in planning to make his birthday card, I thought I would make him something a little more grown up looking,  because he likes to think he is such big stuff!  And when I saw the Mojo Monday sketch for this week, I knew it would work perfectly for the stamps I had in mind.  Be sure to go check out the sketch yourself, because this is contest week too.  It also works with the CR84FN45 color challenge - see the graphic at the bottom of my post for the inspiration!

Here's what I came up with - hope he likes it!

As my usual, this is a 5"x7" card.  I started with a kraft card base, and pulled out my Dreamin' paper pack from Close To My Heart.  This is a pretty flowery Fall collection, but since the papers are double-sided, I just chose the more "manly" designs for this card.  I distressed everything for a more masculine feel, including using the Edge Distresser on the blue & brown cardstocks, and ink swiping on everything.  I also spritzed my sentiment block with diluted Chocolate reinker in a spray pen.  I used a square punch to create the notch at the bottom of the "ribbon".


I cut my circles to match my stamps with my Cricut and the Art Philosophy Cricut cartridge.  Since I knew I was using the limited edition Little Reminder stamp set, I cut the circles to the sizes indicated on the carrier sheet for the stamps.  Then I stamped the outer circle months and the inner dates, adhered the layers together, and circled the appropriate date with my markers.  I stamped my sentiment using a birthday stamp from my stash in Chocolate, and a sentiment from Little Reminder in Pacifica.  After lining up the blocks on my card front, I trimmed down the circle to fit rather than layering on top of it, because of the thickness.

I liked the idea of the flower in the sketch, and I made mine using the Art Philosophy cartridge again.  For a more masculine fell, instead of cutting a flower shape, I cut 4 layers of the 2 different starburst shapes in two colors.  For the center, I used a button shape from the Dreamin' MyStickease pack, adhered it to a round Dimensional Element, and inked the edges.  Finally, I added the line of Opaques Mocha adhesive gems.


Thanks for stopping by! Be sure to go check out Mojo Monday and CR84FN for yourself.  And don't forget, you can shop online 24/7 for all of the products listed just by clicking the links!
Related Posts Plugin for WordPress, Blogger...