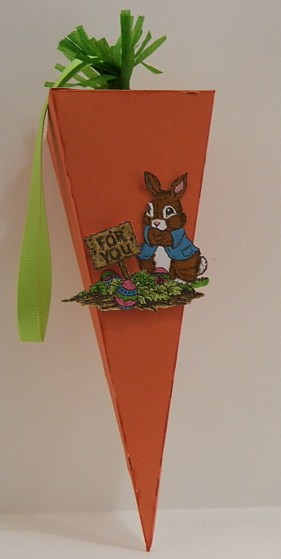
To make my "carrot", I used my Cricut Expression with Make The Cut software. The design is actually from a Valentine Treat Cone SVG set I bought at Lettering Delights. I cut it from Sunset CS, scored it, folded it, and distressed all the edges with my Sunset ink pad. I attached a looped ribbon for a hanger to one of the flaps, and adhered the flaps closed, all using Glue Dots.
Next I used some white crepe paper streamer and colored it by rubbing it with a Pear ink pad. Once it was dry, I fringe cut it, put a line of Liquid Glass near the uncut edge, and rolled it around the ribbon. Finally, I attached the bunny image and 2 eggs directly to the "carrot", the final egg to the garden image, and I adhered the garden image using foam adhesive tape.
Now it's all set to be hung from an Easter tree! I hope to find time to make these for all of the "little" kids who participate in the Easter egg hunt at my parents' house this year.


I hope you enjoyed my project today! If you like what you see, please consider following me and checking out my other projects. Once I hit 500 followers, I'll be posting another blog candy giveaway.
Now, when you're ready to hop on down the bunny trail, head on over to Annette's Creative Journey and see what she has in store for us this month.

very cute! Thanks for sharing.
ReplyDeleteSmiles Sher
Cute carrot!
ReplyDeleteLOL I just knew that at least one other consultant would do a Carrot Treat Box, too! LOL So did I. I think they are adorable, don't you? I LOVE yours! :-)
ReplyDeleteLove it!! What a cute idea!! : )
ReplyDeleteThis is SO adorable!!!!
ReplyDeleteVery cute. Boy that bunny sure would be happy with a carrot that big!
ReplyDeleteCute project!
ReplyDeleteWhat an adorable little Stamp. I love the idea of turning the box into a carrot. Super creative!!
ReplyDeleteAbsolutely precious Lori!!!!
ReplyDeleteLove the carrot holder. would be a great place to hide little easter chocolates.
ReplyDeleteThinking outside the box here using the Valentine idea! I am so bad at that!
ReplyDeleteI've been looking around and have found so many useful and gorgeous ideas. Thanks for sharing
Very Cute!!!
ReplyDeleteSuch a fun project!
ReplyDeletegreat project !
ReplyDeleteHUGS !
Alex
http://www.youhadmeatcraft.com/
so cute!! love the carrot
ReplyDeleteCute project.
ReplyDeleteVery creative!
ReplyDeleteThese carrot treat boxs are so much fun! How adorable!
ReplyDeletevery cute! Thank you for sharing this project!
ReplyDelete